Step-by-step recommendations: how to grow potatoes from A to Z
Potatoes are an integral ingredient in many dishes and have high nutritional value. Although many gardeners grow it, not all of them are ready to boast of a rich and high-quality harvest. When cultivating vegetables, it is important not only to follow basic agricultural techniques, but also to know some tricks.
What methods of growing potatoes exist and what to pay special attention to when planting and caring for them, read on.
Potato planting dates
Growing a crop in open ground requires following the basic rules of agricultural technology. Particular attention is paid to the timing of planting potatoes. It is planted in the spring, when the soil temperature reaches +10°C at a depth of 15 cm and the threat of cold weather has passed.
Specific dates depend on the region: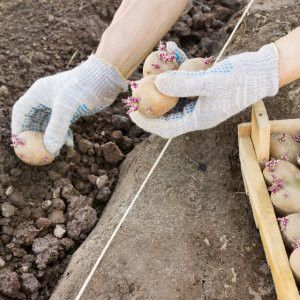
- southern regions - late March or early April;
- regions with a temperate climate - the second half of April;
- northern strip - early May.
Some summer residents plant potatoes in the ground, taking into account the ripening time of the tubers. Early varieties are planted 2 weeks earlier, while mid-season and late varieties are planted according to the schedule indicated above.
Many gardeners take into account the indicators of the lunar calendar. Plants are planted during the waning moon. The schedule for 2020 is as follows:
| Month | Unfavorable days | Favorable days | Neutral days |
| April | 3-4, 9, 15–17, 20–22, 29-30 | 1-2, 7-8, 10, 14, 23-24, 28 | 5-6, 11–13, 18-19, 25–27 |
| May | 8, 14, 29 | 2-3, 5, 7, 11-12, 15-16, 25-26 | 1, 4, 9-10, 13, 17, 24, 27-28, 30-31 |
| June | 21, 29 | 1–5, 8, 12, 18, 22, 25 30 | 6-7, 9–11, 19-20, 24–28 |
Important! If you plant potatoes at an unfavorable time, the seedlings will take a long time to appear and there will be a threat of crop loss.
Preparing for landing
To speed up the emergence of seedlings, increase the germination of planting material and make plants resistant to diseases and weather conditions, it is important to properly prepare the tubers for planting.
Step-by-step preparation:
- Calibration The tubers are sorted and all damaged specimens with traces of disease are removed. Then sorted by size. Potatoes the size of a chicken egg are ideal for planting.
- Treatment for diseases. It is carried out in two stages: first, the tubers are soaked in a light pink solution of potassium permanganate or in copper sulfate (1 teaspoon of powder per 1 liter of water). Then wash with a solution of boric acid (take 0.5 tsp of powder per 3 liters of water). After each step, the vegetables are dried.
- Growth stimulation. Planting material is soaked for half an hour in a growth stimulator, for example, “Solution”. After this, the potatoes are allowed to dry completely.
- Germination.
- Hardening. Planting material is taken out for 2 days in a room with a temperature of +10...+12°C.
Methods germination (vernalization) of tubers:
- Potatoes are placed in one layer in a bright room with a temperature of +12…+20 °C. Until sprouts appear, it is regularly sprayed with warm water.
- The tubers are laid out in one layer on the street or on the balcony in a bright place, sprinkled with a layer of peat or straw. If the temperature drops, the planting material is additionally covered with film.
- Vegetables are placed in one or more layers in damp sawdust, burlap or peat. During germination, maintain a sufficient level of substrate moisture.
- Dig a hole 20 cm deep, fill it with a layer of compost, lay out planting material on top and cover it with a layer of earth.
Potatoes are often planted whole, but to save money, they are cut into several parts so that a sprout remains on each of them.
By the way! To quickly “awaken” the tubers, they are dried for 7–10 days in a warm, bright room at a temperature of +15…+20°C. Afterwards they are heated for 3-4 days at +30…+35°C. This accelerates the germination of the eyes and increases the crop yield.
Site preparation
Potatoes are grown without seedlings, so only the soil in the garden is prepared.
The culture loves light, nutritious soils. An excellent option is black soil. Heavy soil is diluted with sand. Solanaceae love slightly acidic soils. In soil with high acidity, the crop will also grow, but the yield will decrease and the likelihood of pest damage will be higher. If the acidity is low, add ash or dry lime (1 tbsp per 1 m2).
Selecting a location
Potato is a light-loving plant. Well-lit areas of the garden are suitable for it. Groundwater in the selected location should not be too close to the surface.
No nightshade crops should be grown in the potato bed for the past 2 years. Good predecessors: melons, legumes, greens, cabbage, carrots.
The rules of proper plant juxtaposition are observed on the site. Other nightshades are not planted nearby to avoid damage by diseases and pests.
Fertilizer application
In the fall, the beds are dug up and cleared of weeds. Add 6 kg of humus or cow manure to the soil for every 1 m2. Additionally, the collected plant remains are cleaned of roots and seeds, the remaining parts are crushed and buried in the ground.
In the spring, the soil is dug up again and cleared of weeds. Ash (1 tbsp per 1 m2), superphosphate (25 g per 1 m2) and urea (15 g per 1 m2) are added to the ground. All fertilizers are mixed with the soil.
Important! The beds are watered with a hot solution prepared from 1 bucket of water and 1 tbsp. l. copper sulfate.
A handful of ash is poured into each potato hole. Some vegetable growers use long-acting granular mineral fertilizers.
Planting schemes and technology
Different schemes are used for cultivating crops. In all cases, immediately after planting, the beds are watered with water at room temperature. At night for the first 2 weeks, the area is covered with film. To plant and care for potatoes in open ground over a large area, a “Cascade” walk-behind tractor and other equipment are used.
The list shows the most popular technologies for growing potatoes.
Classic technology
Make beds 20 cm high and 160 cm wide. 30–50 cm are left between them. 2 rows of potatoes are planted on each hill, maintaining a distance of at least 80 cm between them.
Dutch scheme
If groundwater is close to the soil surface, potatoes are planted in ridges. The rows are placed at a distance of 75 cm from each other, a gap of 50 cm is made between the holes. Humus and ash are poured into each recess, after which a tuber is placed.
The potatoes are sprinkled with earth on both sides, forming a ridge. As it grows, add soil and remove weeds. As a result, the elevations reach 30 cm. This scheme is called Dutch.
Under the shovel
Planting under a shovel is the most popular and ancient method. For each tuber, dig a 6-10 cm hole. Throw potatoes into the hole, 1 tbsp. l. ash or long-acting granular fertilizers are covered with earth.
The disadvantage of this method is that the vegetable is sensitive to high humidity when planted shallowly.
Under the straw
Caring for potatoes makes it easier to grow them under straw. To do this, the tubers are laid out in one row on a moistened dug-up bed, at a distance of 25–30 cm from each other.The planting material is sprinkled on top with a thin layer of soil and a 20 cm layer of straw. In this case, it is not necessary to mulch and loosen the beds.
The only negative is that straw attracts slugs and rodents.
Under mulch
When cultivating under mulch, sawdust, humus or peat are used. Planting scheme, like under straw.
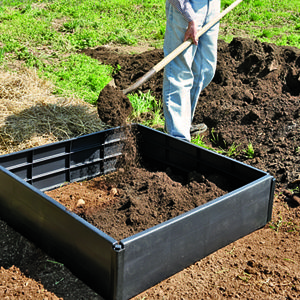
In bags, boxes or barrels
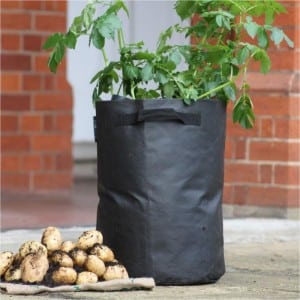
Growing potatoes in bags, boxes or barrels is easy. To do this, fill a 20 cm container with a mixture of garden soil and compost. Then 3-4 sprouted tubers are laid, which are covered with earth.
When the height of the bush reaches 15 cm, add 6-7 cm of soil. This is done several times. This method allows you to get a rich harvest without weeding, mulching and hilling. It reduces the risk of plant rot and late blight.
Chinese scheme
The Chinese method excludes hilling and mulching. To do this, dig holes 50 cm deep and 70 cm wide in a checkerboard pattern. 6 cm of fertile soil are poured onto the bottom and potatoes are laid. 6 cm of soil is sprinkled on top of the tubers.
When the plant reaches a height of 15 cm, such an amount of soil is poured into the hole so that the stem is half covered. This is done until the holes are filled and slides 10 cm high are formed above the surface of the site. Preparing planting holes is a rather complex process that gives the highest yields.
Deep landing
When planting deep, holes are dug 15–20 cm below the soil level, sprouted and processed potatoes are laid out sprouts down, and 2–3 cm of damp soil is sprinkled on top. This option is suitable for dry regions.
Mitlider method
Make beds in the direction from north to south, 50 cm wide. A distance of 1 m is left between them.Potatoes are buried 10 cm in 2 rows. A trench 5 cm deep is made between the rows, water and fertilizers with magnesium, molybdenum, potassium, nitrogen, phosphorus and boron are poured into it. This is a costly method, but it increases productivity by an order of magnitude.
In the trench
Planting in trenches will allow you to get a rich harvest and do without fertilizing. In the fall, trenches are dug 30 cm deep at a distance of 70 cm from each other. They are filled to a height of 15 cm with straw, plant debris, and 25 g of urea per 1 m2. Additionally, add 1 tbsp per 1 m2. ash. In spring, tubers are placed in the depressions and covered with soil.
Feeding
Fertilizers are applied to all phases of potato development. Alternate mineral and organic compositions, use them 3-4 times per season:
- 2 weeks after emergence;
- when the first bud is formed;
- during the period of mass flowering.
Additional compositions are used depending on specific conditions: if potatoes are planted in poor soil or have signs of nutritional deficiency (flaccid leaves, reddish veins, etc.), add another feeding.
Home remedies for fertilizing potatoes are the safest:
- Chicken manure or mullein is diluted in a ratio of 1:10 with water. Add 15 g of urea to the composition bucket. Apply 1 liter for each bush.
- Dilute 1 tbsp in a bucket of water. ash, 15 mg of potassium sulfate and 30 mg of superphosphate. 1 liter of product is poured under each bush.
- Onion peels and compost are used to enrich the soil: they mulch beds or water crops.
- The bucket is filled 2/3 with nettles or other weeds without roots and seeds. The rest of the space is filled with water at room temperature. The mixture is infused for 10 days. For 1 liter of the resulting composition take 5 liters of water.Consumption: 1 l per 1 bush.
Purchased fertilizers are also used in potato growing, diluted according to the instructions:
- "Nutrivant Plus";
- "Zn-L Code";
- "Hera."
Potato care
Let's look at how to properly care for potatoes. To do this, follow basic agrotechnical practices: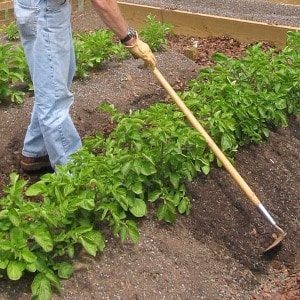
- Loosening. Before the first shoots appear, this is done 2-3 times to ensure normal air exchange. Further loosening is carried out after watering.
- Weeding. In beds with young plants, weeds are constantly removed. When the bushes grow, they will cope with them on their own.
- Hilling. This is a mandatory stage in growing potatoes, allowing you to get a rich harvest. The soil is raised 6 cm 3 times per season. The bushes are first earthed when they reach 15 cm, then 2-3 weeks before the buds appear and as the potatoes grow to 20–25 cm in height.
- Watering. In dry summers, plantings are moistened once every 2 weeks. Up to 3 liters of water are consumed per bush. During the rainy season, watering is not necessary.
Mulch the soil when planting or in the fall.
Diseases and pests
Basic preventive measures:
- compliance with crop rotation rules;
- treatment of the crop after cold weather with antifungal agents (“Fitosporin”, a light pink solution of potassium permanganate);
- disinfection of soil, planting material and garden tools;
- compliance with the watering regime;
- timely payment fertilizing.
Potatoes are susceptible to a number of diseases. The most common ones are:
- Late blight. Hard or gray spots appear on the tubers and spread throughout the plant. The leaves wither and turn black.
- Potato cancer. Discoloration and swelling on the tubers and the ground part of the bush are characteristic. Later, dark growths form.
- Dry spotting. The greenery becomes covered with dark brown spots, which soon dry out. Holes appear in the leaves.
- Alternaria blight. The tubers are covered with round, depressed spots, and the leaves are covered with black formations.
- Infectious wilts. This is a group of diseases in which the above-ground part of the bush withers. Brown or brown spots appear on the tubers.
Fungicides are used against the fungal diseases listed. Viral infections have no cure.
Important! It is more difficult to cure potatoes than other plants, since the disease affects tubers that are in the ground.
Insects also harm the crop: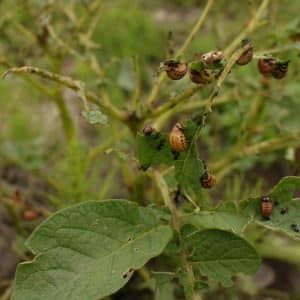
- Colorado beetles. They eat potato greens. Remove pests manually. Sprinkling the leaves with ash or special preparations (“Barrier”) helps.
- Wireworms. These are the larvae of click beetles that eat tubers. For prevention, water the soil with boiling water before planting vegetables, creating a slightly acidic environment.
- Cicadas. They look like aphids and feed on the juice of potato leaves. Dry brown spots form in places of damage. Chemical agents are used against insects (for example, “Karate Zeon”).
- Potato flea beetles. Adults attack greenery, and larvae attack the root system. This leads to wilting of the bush. To control pests, plantings are sprayed with 0.2% phosphamide.
Harvest time

Potatoes are dug up from late August to mid-September, when the tops wither. The approximate timing for early varieties is 80 days, mid-season - 100 days, late - 120 days.
Tubers are harvested in dry, sunny weather to ensure a clean harvest. Use a fork to avoid damaging the vegetables. Store in a dark, dry, cool place, in sulfur-fumigated boxes.
Tips and tricks
Experienced vegetable growers give some more tips on how to grow potatoes:
- During frosts, bushes are completely covered to protect them from death.
- 2 weeks before harvesting, the plantings are sprayed with a superphosphate solution: 25 g per bucket of water. This will improve the taste of the tubers.
- To avoid weeding, the beds are covered with a layer of hay or straw.
Conclusion
Growing potatoes is a simple process that does not require much effort and time. It is important to hill up the plants in a timely manner, feed them, follow the watering regime and rules for disease prevention. Use the recommendations from our article, and you are guaranteed a rich harvest!