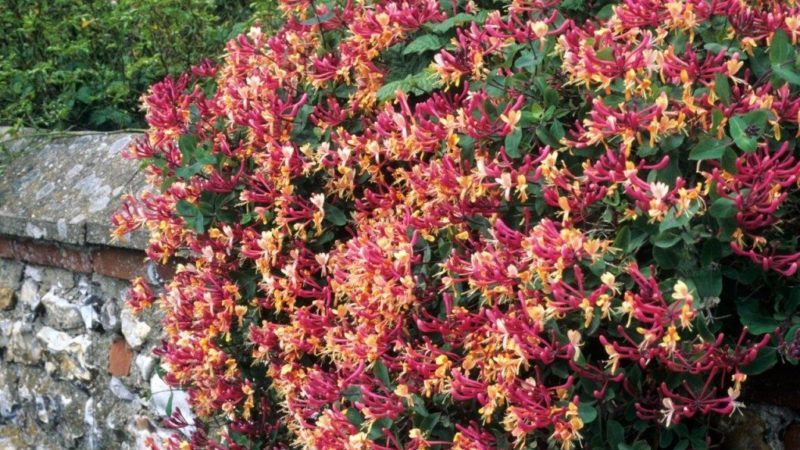
Decorative climbing honeysuckle - cultivation, propagation and care
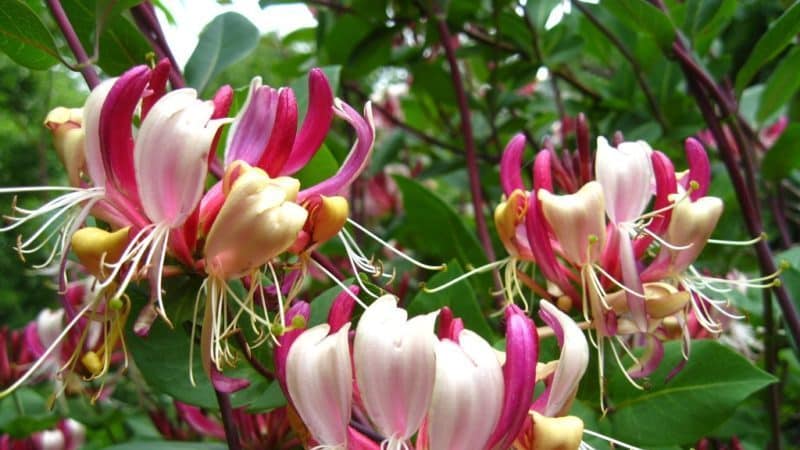
More than 200 species of honeysuckle are known. However, only a few of them produce edible oblong blue berries. The fruits of other varieties are not only inedible, but also poisonous in large quantities. Such cultivated varieties have found application in our areas due to their attractive appearance.
Decorative climbing honeysuckle is a vine. The plant looks attractive and aesthetically pleasing throughout the growing season. Blooms profusely with large delicate inflorescences. During fruiting, it is covered with bright round berries that seem to sit on the leaves. Despite its decorative appearance, climbing honeysuckle is unpretentious. Even a novice gardener can cope with planting and growing it. The main thing is to know the basic rules and nuances.
Methods of propagation of climbing decorative honeysuckle
Climbing ornamental honeysuckle is an unpretentious, hardy plant. It is suitable for cultivation in any region of our country. Quickly takes root in any method of planting.
Decorative honeysuckle can be propagated by both vegetative and generative methods. In the first case, cuttings, layering or dividing the bush are used, and in the second, seed planting material is used. Each option has its own advantages and disadvantages.
Cuttings
Cuttings - the most popular method of propagating honeysuckle. It requires minimal labor from the gardener and is easy to implement.
The main advantage of cuttings is the ease of obtaining planting material. The gardener does not need to carry out any preparatory work - it is enough to simply cut the self-formed shoots. Next year they will be ready to be planted in a permanent place.
When honeysuckle is propagated by cuttings, the varietal characteristics of the ornamental plant are preserved. The disadvantage is that not all planting material takes root. In addition, a plant propagated vegetatively is not as hardy as when using generative technology.
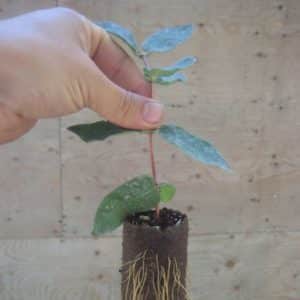
Annual branches with still elastic, but already lignified bark are best suited as planting material. Old and green shoots do not take root well and take root slowly.
Preparation of planting material:
- A cutting 15-20 cm long and 0.7-0.8 cm thick is cut from last year's branch. It should have at least 3-4 live buds. It is important that there are no signs of damage infections and pests, frostbite.
- Before planting, the cuttings are disinfected. It is soaked in a light pink solution of potassium permanganate for 30 minutes or in a solution of “Fitosporin” for 6-12 hours.
- Then root formation is stimulated. To do this, the cuttings are soaked in “Kornevin” or “Solution” for 12-24 hours.
Rooting of cuttings begins when the soil thaws and warms up. This usually occurs at the end of March or beginning of April.
Note! Planting material from one-year-old shoots is cut in late autumn or early spring before the buds wake up.
The cuttings are buried in soil that has been disinfected and watered with a solution of copper sulfate or “Fitosporin” in a shaded area of the garden so that one or two buds are underground, one at ground level and one above ground level.
For the first 2-3 weeks, the cuttings are kept under film, a plastic bottle or bag. The greenhouse is ventilated daily for 30-60 minutes. The cuttings are sprayed with warm water from a spray bottle, watered at the root as the soil dries,
Rooting occurs in a month. This is evidenced by the awakened buds, from which leaves or shoots began to form.
When the planting material takes root, the duration of ventilation is increased, gradually completely dismantling the greenhouse. Caring for the plant until next spring consists of watering, loosening and removing weeds. At the beginning of spring, the rooted seedling is transplanted to a permanent place.
Note! It is also possible to root green cuttings, but they are more difficult to work with. You will need a full-fledged greenhouse or greenhouse to maintain high levels of humidity and heat. Such planting material is cut in mid-summer.
Seeds
Honeysuckle can also reproduce by seeds. In this case, you will have to wait 3 to 4 years for the first flowering. At the same time, the varietal characteristics of the mother plant are rarely preserved.
The main advantage of the method is the ease of obtaining planting material and high germination rate. Creepers grown generatively are more resilient. In rare cases, it is possible to develop an improved version of honeysuckle that retains its beneficial properties. varietal characteristics (this method is used by breeders).
Planting material is collected when the berries are ripe. To prepare it, use one of the following methods:
- Hardening of planting material to stimulate growth. The seeds are cleared of pulp, washed in a solution of potassium permanganate, then soaked there for 30 minutes. Disinfected planting material is dried and ventilated. Then they are placed for 1-3 months in a room with a temperature of +2…+3℃. Hardened seeds are soaked in a growth stimulant (“Epine”) and then planted.
- Planting in pulp. Reviews from gardeners say that honeysuckle planted directly in the berries germinates the fastest. To do this, fully ripe berries are ground. The seeds are planted in the ground along with the berries.
- Pre-germination. To do this, the collected seeds are cleaned of pulp, disinfected, and soaked in a growth stimulator. After this, they are laid out on a saucer shaded with gauze. The planting material is covered with another layer of gauze on top. The material is moistened with warm water, the container is covered with film. The seeds are moistened as the gauze dries. After germination they are planted.
Honeysuckle seeds are sown in boxes with a disinfected soil substrate prepared from peat, sand and garden soil mixed in equal proportions. The seeds are buried 0.5-1 cm. The distance between the seeds should be 3-5 cm.
The first month of sowing requires high humidity. To create optimal conditions, they are covered with film. Water every other day or as the soil dries. The soil must be covered with a layer of mulch (straw, hay, peat, humus).
After the first shoots appear, the mulch is removed. The soil is moistened daily with warm, settled water.
If the planting material was a mixture of crushed berries with seeds, then in the fall the height of the seedlings will reach 5-7 cm. At this stage, they are planted in separate pots (only the strongest seedlings continue to be grown).Honeysuckle is transplanted to a permanent place next spring.
Note! Some gardeners keep boxes of honeysuckle in the garden throughout the summer and autumn. In this case, the seedlings overwinter under the snow. Even young plants of this crop tolerate frost well.
By layering
Honeysuckle can be propagated by layering. In this case, by autumn, 1-3 rooted seedlings are obtained from one branch. This method will allow you to preserve the varietal characteristics of the mother plant and obtain healthy planting material.
How to propagate climbing honeysuckle by layering:
- In early spring, one-year-old shoots are selected from the lower part of the bush. They should not be damaged by diseases and pests.
- At a distance of 10 cm from the branch, dig a groove. The shoot is placed in it (without separating it from the bush) and secured with a metal bracket.
- The shoot is sprinkled with a mixture of soil and rotted sawdust so that its edge and part of the base are above the ground.
- During spring and summer, the buried branch is watered and mulched once every 1-2 days. Fertilizing is applied three times per season (usually a 10% solution of rotted cow or horse manure is used, with the addition of 1 tbsp. ash per bucket). The soil near the shoot is weeded.
- By autumn, the cuttings form a developed root system. This will be evidenced by the shoots that have formed in the buried area.
- The cuttings are dug up, separated from the bush and divided into parts according to the number of branches formed.
Layers are planted in a permanent location in the fall. From one bush you can get up to 20 units of planting material per season.
Dividing the bush
By dividing the bush, climbing honeysuckle is propagated from 3 to 20 years old.This method allows you to obtain a small amount of planting material, which will immediately be suitable for transplanting to a permanent place.
Disadvantage of this method: partial pruning of the entire bush will be required. After this procedure, honeysuckle will begin to bloom and bear fruit only for 2-3 years.
Bush divide in early spring (before the buds wake up) or after leaf fall. In order for the planting material to take root, the entire bush is cut to a height of 10-15 cm. The roots of the plant are dug out of the soil, trying to cause minimal damage.
The dug out bush is divided into 2-4 parts, cutting off the roots in the right places with a sharp, disinfected pruner. The resulting planting material is immediately planted in a permanent place.
Honeysuckle care standard. For the first few weeks, a root formation stimulator is used for watering.
Note! From a bush up to 4 years old it is possible to get up to 3 seedlings, from a plant older than 4 years you get 4-6 seedlings.
Planting seedlings in a permanent place
After the seedlings have been grown using one of the methods described, the honeysuckle is planted in a permanent place. To make the plant feel comfortable, bloom profusely and bear fruit, choose a suitable place.
Climbing honeysuckle needs support. It is recommended to plant it near fences, building facades, gazebos or specially installed trellises.
For decorative honeysuckle, choose well-lit or partially shaded areas. It is better if the chosen location is protected from the wind.
The liana is not demanding on the composition of the soil. It feels uncomfortable only on marshy or sandy soils. It is not recommended to choose places where groundwater is located too close to the surface.
The plant loves slightly acidic soils.If the acidity is high, add ash or dry lime; add high-moor peat to alkaline soils.
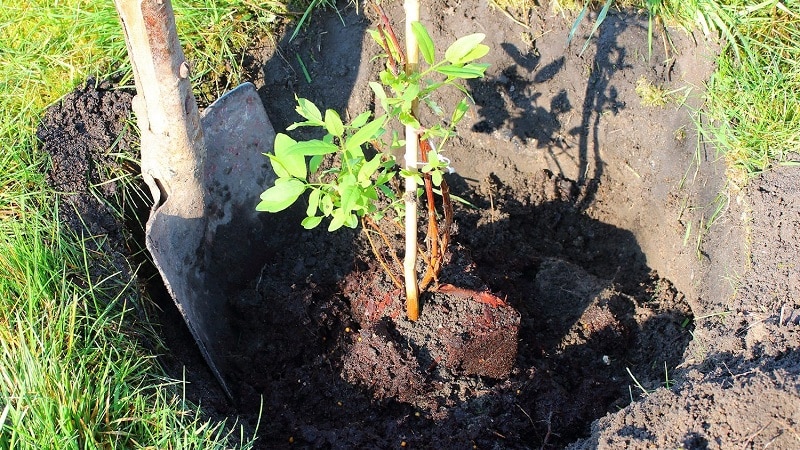
Planting seedlings in a permanent place:
- Dig holes at a distance of 2-3 m from each other. The size of the recess is 40x40x40 cm.
- A drainage layer of 5 cm is poured into the bottom of the pit. Expanded clay, broken ceramics, small crushed stone, and shell rock are used.
- Garden greens taken from the hole are mixed with 50 g of superphosphate, 1 kg of ash, 2 buckets of compost.
- A small mound of nutritious soil mixture is formed in the center of the recess. A seedling is placed on it. The root system is evenly distributed around the earthen mound.
- The hole is filled with the remaining soil without deepening the root collar.
- The seedling is watered with a light pink solution of potassium permanganate at room temperature.
- If the soil has settled, add the missing amount. Then the area around the vine is mulched with humus or peat.
Necessary care for young plants
In order for honeysuckle to develop quickly, bloom profusely and bear fruit, it is important to properly care for it. An unpretentious plant that does not take much time for gardeners. The main thing is to know the basic rules and nuances.
Procedures for caring for decorative honeysuckle:
- Watering. The first two months after planting a seedling in a permanent place, honeysuckle is watered as the soil dries and regularly sprayed with warm water. Older vines are watered only if there is no precipitation, no more than once every 2 weeks. The tree is sprayed at the same frequency.
- Loosening and weeding. The soil is loosened the next day after each watering or precipitation to destroy the earthen crust. During the loosening process, weeds are removed.
- Mulching.To slow down the growth of weeds, avoid loosening, protect the roots from diseases and pests, and insulate the soil around the plant, cover it with a layer of mulch. Use peat, humus, hay or straw.
- Formation. Climbing honeysuckle tolerates pruning well. During formation, the plant is given the desired shape. The liana is formed in early spring. To force honeysuckle to throw out more shoots, remove the ovaries immediately after the vine blooms.
- Sanitary pruning. Sanitary pruning is carried out after leaf fall. Remove all dry, damaged and pest- and disease-affected branches.
- Garter. As it grows, climbing honeysuckle must be tied to a support or leaned against the facade of a building.
- Feeding. Fertilizing begins 2 years after planting. In spring, rotted manure is incorporated into the soil. In the summer, they are fed 2 times with a solution of nitrophoska (15 g per 10 liters of water) and 0.5 kg of ash is embedded in the soil once. Ash feeding is repeated in the fall before wintering.
- Wintering. Young plants are additionally mulched for the winter, raising the protective layer by 10-15 cm along the trunk. It is recommended to remove the vine from the support. If the winter is snowy, it is useful to sprinkle the plant with snow.
Conclusion
Climbing honeysuckle is widely used to decorate areas. It occupies a significant place in landscape design. Abundantly flowering and beautifully fruiting plants adorn the facades of buildings, fences or gazebos. It is often used to zone a site as a green fence.
Despite its decorative appearance, climbing honeysuckle remains a hardy and unpretentious plant. It has high winter hardiness, is undemanding to care and can grow even in regions with cold climates.