Growing and caring for turnips in open ground
Turnip is an unpretentious and frost-resistant vegetable. Seeds germinate at an air temperature of -2°C, so the plant is successfully cultivated even in northern regions. Let's look at ways to grow turnips in open ground and the requirements that they place on planting and care.
Growing turnips
Grow turnips seedlings or sowing directly into open ground. The average yield, subject to agrotechnical requirements, is 3-4 kg per 1 m².
The crop is not planted after radish, cabbage, daikon or radish. Suitable predecessors are potatoes, tomatoes, cucumbers, corn, pumpkin, legumes and squash.
How and by what means turnips reproduce
It is a vegetable with a 2-year growing season and is propagated by seeds. In the first year after planting, turnips form root crops with leaf rosettes, in the second year they produce an arrow with flowers on which they ripen. seeds.
To obtain seeds, root crops with good varietal characteristics are selected and placed in storage. In the fall, the plot is dug up and fertilized with humus; in the spring, the digging is repeated and vegetables are planted in rows every 30–40 cm. The peduncle is tied to a support and, when the pod turns light yellow, the seeds are collected.
Reference. To obtain seeds, varieties intended for winter storage are used.
The planting material is peeled and dried. The seeds are dipped in a saline solution and any floating specimens are removed.The grains that have settled to the bottom are wrapped in cloth for 5 minutes, immersed in hot (+40...+50°C) water, and then in cold water for 2 minutes. After this, they are soaked for 20 minutes in a solution of potassium permanganate, washed, soaked in water for 2-3 days to swell, and in a solution of a growth stimulator (Epine-extra, Zircon) for 24 hours.
How to plant seeds in open ground
The timing of sowing seeds depends on the purpose of growing turnips. For spring (April–May) sowing, the crop is harvested in the summer; for winter storage, the crop is planted in the summer (June–July). Pre-winter (October - November) sowing is carried out to obtain a harvest in the spring.
For planting, choose a place with peat, sandy loam or loamy soil, located on a plain or in a small depression. In the fall, the site is dug up with a shovel and 2-3 kg of humus or compost, 10-15 g of nitrogen-phosphate and 15-20 g of potassium fertilizers per 1 m² are added.
Sowing rules:
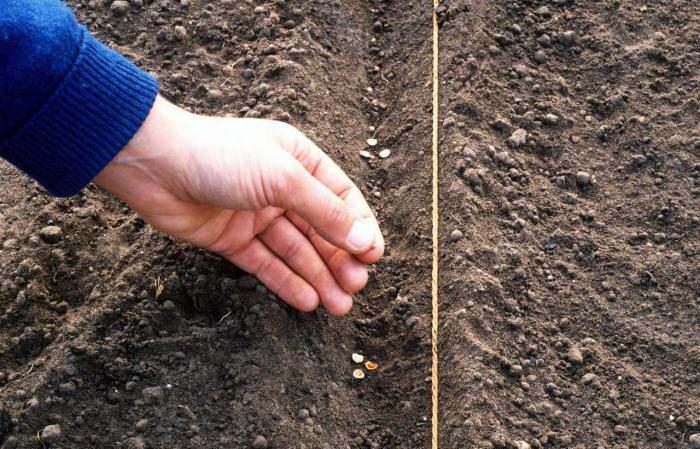
- Prepare beds in the selected area at a distance of 20–35 cm from each other.
- Make planting furrows 1.5–2 cm deep in them every 10 cm.
- Place seeds in them at the rate of 0.2-0.3 g per 1 m².
- Cover the plantings with sand, then humus or loose soil.
- Water the area and cover the beds with polyethylene.
- Remove the covering material after 2 days.
To make planting easier, the seeds are mixed with sand in advance or glued to tape.
When sowing in winter, the seeds are buried 3-4 cm and sprinkled not with frozen soil, but with peat or sand. When snow falls, it is thrown onto the beds, repeating the procedure 2-3 times per season.
Shoots appear after a week or 3–5 days (if the air temperature is +15…+18°C). When the plants form 2 pairs of leaves, the seedlings are thinned out so that the distance between them is 6–10 cm.
Reference. The average planting density is up to 50 root crops per 1 m².
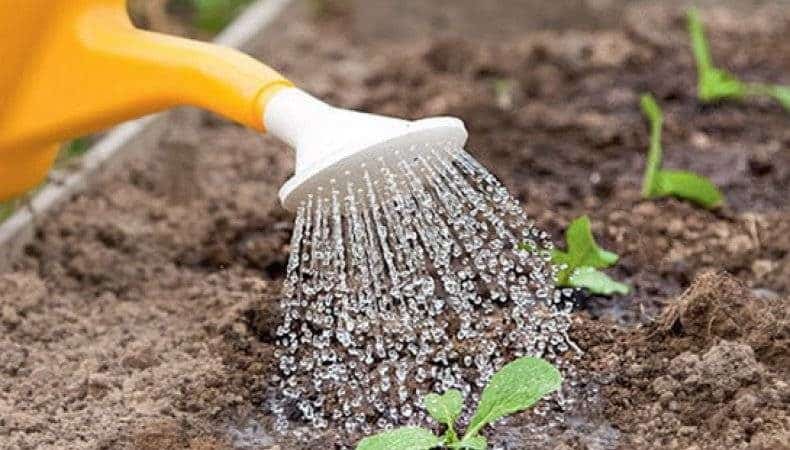
Plants are watered as the soil dries out at the rate of 20 liters of water per 1 m².
Growing through seedlings

Seeds for seedlings are sown in wooden containers or individual containers with a suitable substrate 6-8 weeks before transplanting the seedlings into open ground.
Seedlings do not tolerate picking well, which risks damaging the root system, so the best option is to sow the seeds in peat tablets. They are pre-soaked, and after the peat mixture swells, 2-3 grains are placed in each.
The containers are covered with polyethylene and placed in a bright place, but protected from direct sunlight, at a temperature of +10...+15°C.
After germination, the film is removed and the temperature is maintained within +6...+12°C. When the plants open their cotyledons, the seedlings are thinned out, getting rid of weak and non-viable specimens, cutting them off at the soil surface level.
Watering is carried out as the soil dries, preventing it from drying out or becoming waterlogged. After moistening, the substrate is carefully loosened - this increases its moisture permeability and aeration.
4-5 days after the cotyledons open, the plants are watered with a solution of “Nitrophoska” (1 tablespoon per bucket of water) at the rate of 10–15 ml per seedling.
15–20 days before transplanting into open ground, the plants begin to harden. To do this, containers with seedlings are taken out onto the street or balcony every day, first for an hour, gradually increasing this time so that in the last days the seedlings remain outdoors for 24 hours.
Reference. When growing seedlings in peat tablets, the seedlings are transplanted into the beds along with them.
When to plant plants in open ground? The culture is transferred to the site around mid-May.To do this, beds are formed in the prepared area and planting holes are dug every 25–30 cm. The seedlings are removed from the containers along with a lump of earth, placed in the center of the holes, sprinkled with soil, compacted and watered.
Caring for turnips in open ground
To get a bountiful harvest of juicy and large root crops, plants are provided with proper care, including watering, fertilizing, weeding and protection from pests.
Watering
This is a moisture-loving culture. Prolonged drought negatively affects the quality of root crops - they begin to taste bitter and lose their juiciness. At the same time, an excess of moisture provokes the development of diseases and rotting of plants.
In the absence of regular rainfall, turnips are watered on average once every 3 days. Water consumption during germination of seedlings is 8–10 liters per 1 m², during the formation of root crops — 10–12 liters per 1 m².
Watering is carried out by sprinkling before sunrise or after sunset, using warm, settled water.
Important! To prevent root crops from cracking, reduce watering when they have grown sufficiently in volume.
After moistening, the ground is mulched with straw or sawdust to retain liquid.
Weeding and loosening
After each watering or rain, the soil is loosened to eliminate the risk of a dry crust forming on its surface, which disrupts the aeration and moisture permeability of the soil and provokes deformation of root crops. At the same time, weeds are removed.
Feeding
The crop is fertilized 2 times per season:
- 4 weeks after emergence, complex mineral fertilizers are applied (Nitroammofoska, superphosphate, potassium chloride or potassium magnesium);
- in mid-summer - 250–300 g of wood ash per 1 m², watered with a solution of potassium sulfate (10 g per bucket of water).
If the soil is sufficiently fertile, additional fertilizers are dispensed with.
Features of growing turnips in different regions
Due to the crop's short (60–80 days) growing season, 2 turnip crops are grown per season. However, planting times vary depending on the region.
Spring sowing is carried out when the soil warms up to +10...+15°C. In central Russia and the Moscow region, this is most often the end of April - the beginning of May, in the Urals and Siberia - the first ten days of May. In summer, in the Moscow region and central Russia, planting is carried out in mid-July, in the northern regions - in early August.
The climatic conditions of the region also affect the care of plants. Thus, in the southern regions, characterized by hot and dry summers, watering is carried out more often than in the north.
Pests and their control
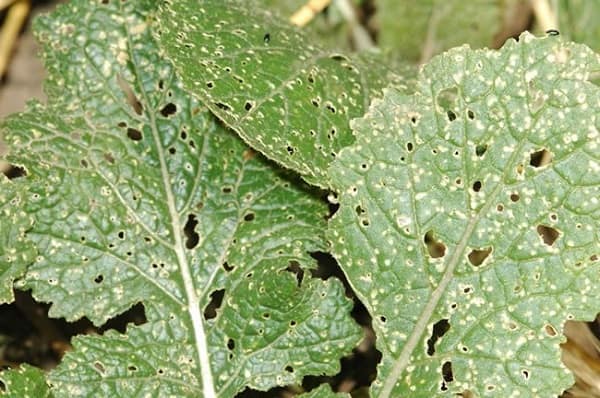
Among the pests, the most dangerous are cruciferous flea beetles, cabbage flies, cutworms, cabbage and turnip whites.
Leaves with holes due to cruciferous flea beetle
Crucifer flea beetles are black, green or blue bugs measuring a maximum of 10mm that feed on turnip tops, causing crop failure.
To prevent their appearance, they regularly carry out weeding and autumn digging of the soil, plant phytoncidal plants nearby (calendula, nasturtium, garlic, tomatoes, marigolds), observe turnip planting dates and watering rules.
What to do if turnip leaves have holes? To get rid of pests, the beds are sprayed with a soap-herbal infusion (800 g of dry yarrow and 50–60 g of soap shavings per 10 liters of water), a vinegar solution (1 tablespoon of vinegar per 10–12 liters of water) or potato broth (4 kg of tops per 10 liters of water). If traditional methods do not help, use insecticides (Karbofos or Actellik).
Scoop
Pest larvae feed on the green part and pulp of turnip roots. To get rid of them, plants are sprayed twice with an interval of 2 weeks with Eurodim or Akiba insecticides.
Cabbage fly
Cabbage fly larvae damage the roots and leaves of the crop. To control pests, turnips are dusted with wood ash or tobacco dust, and sprayed with Karbofos or Topaz.
Cabbage and turnip whites
The caterpillars eat the tops and damage the turnip roots. To control pests, plantings are sprayed with soap-ash (2 tbsp. ash and 1 tbsp. liquid soap per 10-11 liters of water), onion (2 liters of can of husk per 2 liters of boiling water), tomato (2.5-3 kg tomato tops per 5–5.5 liters of boiling water) with infusions or insecticides (“Fitoverm”, “Aktara”).
Wireworms or click beetles
Beetle larvae eat root crops and leave holes in the pulp. Get rid of insects by spraying the plantings with a solution of potassium permanganate or a decoction of onion peels.
How turnips bloom
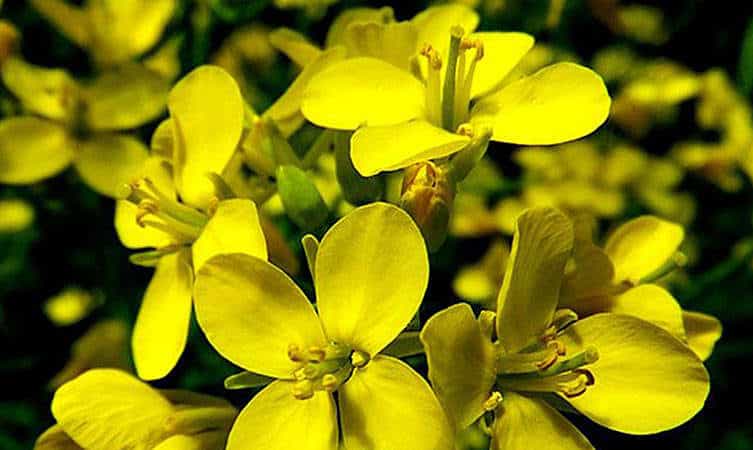
Regardless of the variety, turnip is a juicy and fleshy root vegetable with a basal rosette consisting of large leaves and a stem 50–140 cm high with golden flowers.
At the beginning of flowering, the plant forms a corymbose inflorescence, which later becomes racemose, and the flowers are located on an elongated main axis. The peduncle, 3–8 cm long, is deflected at an acute angle; the flower consists of 4 cross-shaped calyxes, 4 petals, 2 short and 4 long androecium and 1 pistil.
Ripening time and harvest
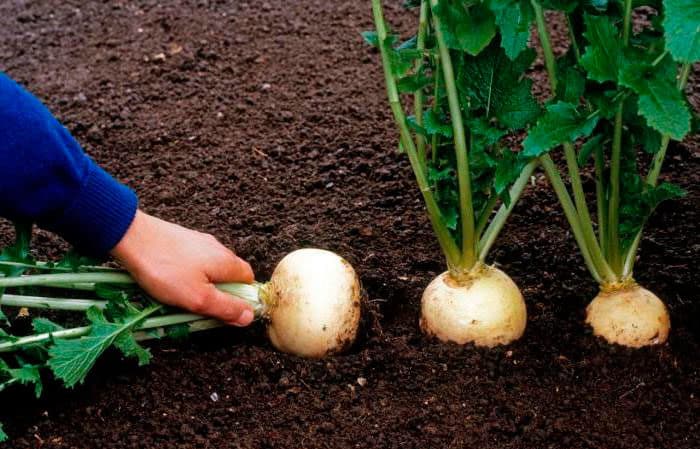
The harvest is harvested as soon as the roots reach a diameter of 6 cm or more. For winter storage, turnips are harvested in late September - early October.
Root crops are pulled out or dug up, the tops are cut off, leaving a tail no more than 1 cm long, cleared of soil, sorted and dried.
Vegetables are placed in wooden boxes, sprinkled with sand and stored in a dark room at a temperature of 0...+3°C for 3 months. Turnips can be stored in the refrigerator for a maximum of 1 month, at room temperature - 10-15 days.
This is interesting:
Does turnip with honey help with cough and how to use this medicine correctly
Proven ways to properly store turnips for the winter
The best recipes for preparing turnips for the winter from experienced housewives
Conclusion
Turnip is an unpretentious vegetable that even novice gardeners can handle cultivating. Knowing how to grow a crop correctly, you will be able to get 2 harvests of root crops per season. The main thing is to observe the timing of sowing seeds, monitor the frequency of watering and not neglect preventive treatments of plantings against pests.