Review of potato planters for a walk-behind tractor and how to make it yourself
A potato planter is an agricultural unit that can significantly increase labor productivity when planting potatoes. The process requires less effort and time, unlike manual planting. As a means of small-scale labor mechanization, a potato planter for a walk-behind tractor is aimed exclusively at summer residents and other small agricultural producers. For such users, the cost of the unit is of paramount importance. We will tell you in detail how to save money by assembling the device yourself.
What is a potato planter
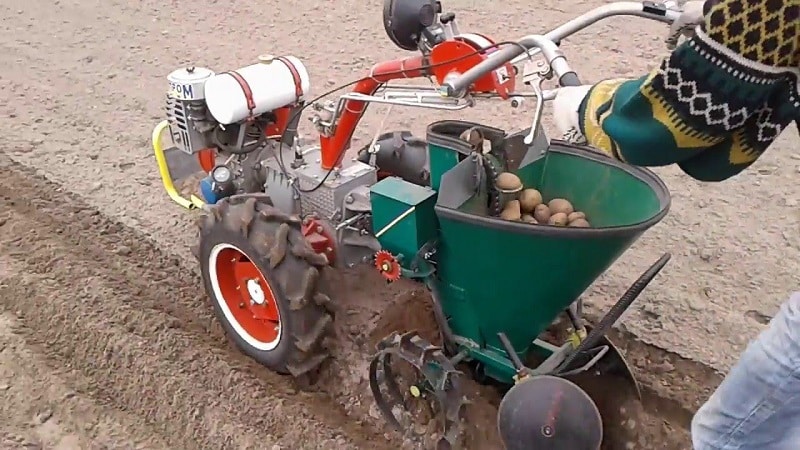
The potato planter automatically plants tubers at regular intervals and covers them with soil.
Important! The unit has a power unit that ensures its movement along the bed and creates sufficient traction to continuously cover the tubers with soil. That is, it is quite possible to convert a regular walk-behind tractor into a potato planter.
Technologically, the potato planter can be divided into three components:
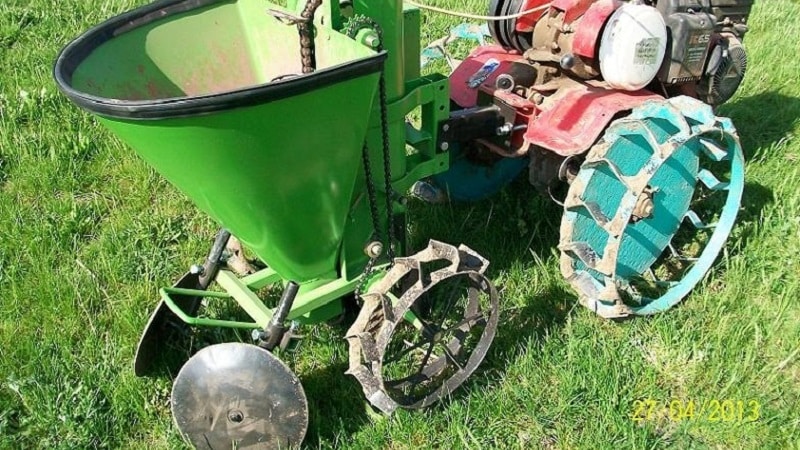
- Power block.
- Bunker for storing and supplying potatoes for planting.
- Openers for raking soil (for covering tubers placed in beds).
Depending on the engine power of the walk-behind tractor potato planters differ in the following functional characteristics:
- According to the speed of passage and planting of tubers.
- According to the volume of the bunker in which the seed material is placed (the more powerful, the more potatoes).
- According to the provided planting depth.The performance of the coulters depends on the power of the power unit, or rather, what kind of land they can work with. The more powerful the engine, the more soil the block can cover the planted tubers.
Planting depth is not a determining factor, because during the processing of potatoes it will still have to be hilled.
Important! Planting too deeply will result in seedlings taking longer to germinate, which will shorten the overall length of the growing season.
Any potato planter requires a competent operator. This is not just a person who directs the block in the right direction. He must understand the whole process of planting potatoes and carefully follow the sequence of actions:
- First, the area must be loosened (plowed) if it is virgin soil, or it is enough to simply disk it if the land is cultivated every year.
- Then furrows of at least 40 cm in height must be cut.
- Next, fertilizers should be spread into the recesses of the furrows - rotted manure or a mixture of nitrogen-potassium-phosphorus fertilizers.
And only then do they begin to land. If you do the work manually, it will take at least five times longer than if you mechanize the process. And, of course, ten times more effort. That's why The main advantages of using a potato planter include::
- multiple increase in productivity;
- minimizing soil cultivation steps;
- the same planting depth;
- ensuring a standard distance between tubers;
- relative ease of operation.
Types of potato planters
Potato planters for walk-behind tractor differ in the following characteristics.
By the number of processed rows
Units are available in one and two rows. Naturally, a double-row planter must have a more powerful engine: if an engine of 6 liters is enough for a single-row planter. With. (like, for example, the Neva walk-behind tractor - 6.5 hp), then the two-row unit must have a power of at least 9 hp. With. (like, for example, the Belarus-09N walk-behind tractor). A double-row block is, of course, potentially more productive, but its processing speed is approximately 1.5 times lower than that of a single-row block. In addition, it requires higher operator qualifications.
Depending on the manufacturer
These devices are produced by many Russian and Belarusian machine-building enterprises, not even necessarily profile ones (for example, as part of conversion). The domestic models KS-1, KS-1A, KSM-1, KTS-2 and KTS-4 for one, two or four rows, respectively, deserve attention.
Reference. The pattern is simple: domestic and Belarusian equipment costs several times less than imported equipment.
By type of technological process
For low-power potato planters, planting potatoes is divided into two stages:
- First, the tubers are laid out in furrows;
- During the second pass, the unit covers the furrow with soil.
For potato planters with stronger engines, this process can be combined: the unit immediately lays out the tubers and covers them with soil in one pass.
Interesting things on the site:
Review of the model of mounted potato planter SN 4B
Review and comparison of the best potato planters for walk-behind tractors
Data on the most popular models of potato planters are presented in the table:
| No. | Potato planter model name | Number of processed rows | Productivity, ha/hour | Hopper capacity, l | Planting depth, cm | Weight, kg |
| 1. | KSM-1 | 1 | up to 0.25 | 44 | up to 15 | 41 |
| 2. | KTS-2 | 2 | up to 0.5 | 150 | up to 15 | 190 |
| 3. | KTS-4 | 4 | up to 1 | 300 | up to 15 | 450 |
| 4. | KST-1/1A | 1 | up to 0.25 | 34 | up to 15 | 33 |
How to make a potato planter for a walk-behind tractor with your own hands
You can build a device for a walk-behind tractor yourself. Let's take a closer look at what is required for this, and also draw up a technological map.
Required materials and tools
For installation you will need:
- channel or angle for a welded frame;
- metal wheels-hooks (it is better to purchase ready-made ones);
- an axis for attaching hooks to it;
- set of bearings;
- steel sheets for a welded bunker (steel thickness - from 1.5 to 2 mm);
- sprockets (19-21 teeth);
- chain from the gas distribution mechanism of the internal combustion engine;
- steel wire (3-4 mm).
Tools required:
- Bulgarian;
- welding machine (semi-automatic is sufficient);
- drill (more powerful);
- compressor and spray gun.
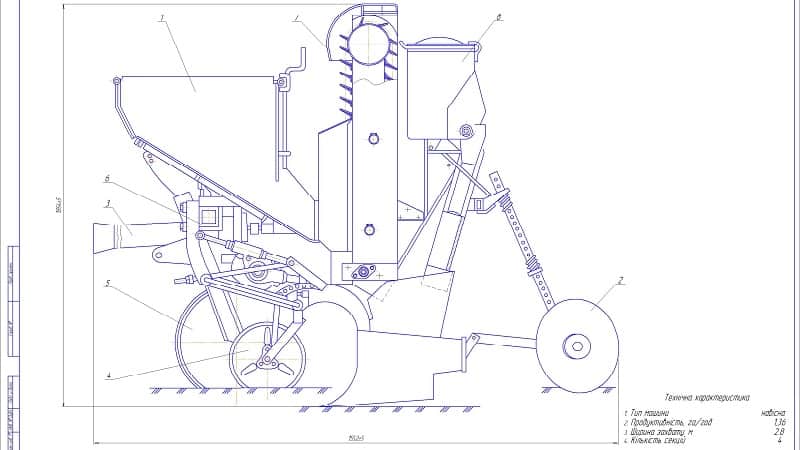
To be more specific, let The model of the proposed potato planter will have the following dimensions:
- frame – 600×300 mm;
- hook diameter – 300-310 mm;
- track (distance between the centers of the hooks) – 600 mm;
- seed tube chain length – 750 mm;
- the distance between the axes of the sprockets holding the seed tube chain is 550 mm;
- bunker – 350×400×400 mm;
- four standard 205 size bearings.
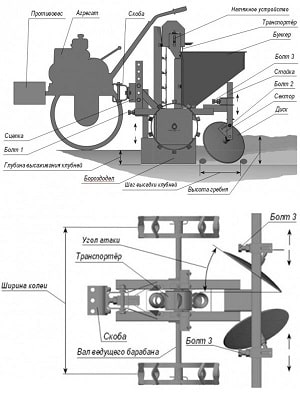
Drawings and dimensions
See the photo for the general schematic structure of potato planters.
The process of assembling a potato planter: step-by-step instructions
Mountings with sprockets are welded in the center of the axle stand between the drive wheels at a specified distance from each other.. Then the bearings and sprocket are pressed onto the axle of the support wheels. A frame is welded from the corner and welded to the central stand of the walk-behind tractor with the expectation that an axle with hooks will be attached to the frame (in this case, the walk-behind tractor, supported by its drive wheels and hooks, must stand level).Next, the axle with hooks is attached to the frame in bearings.
Important! The lugs will rotate from the movement of the walk-behind tractor and pull the chain of the potato planter.
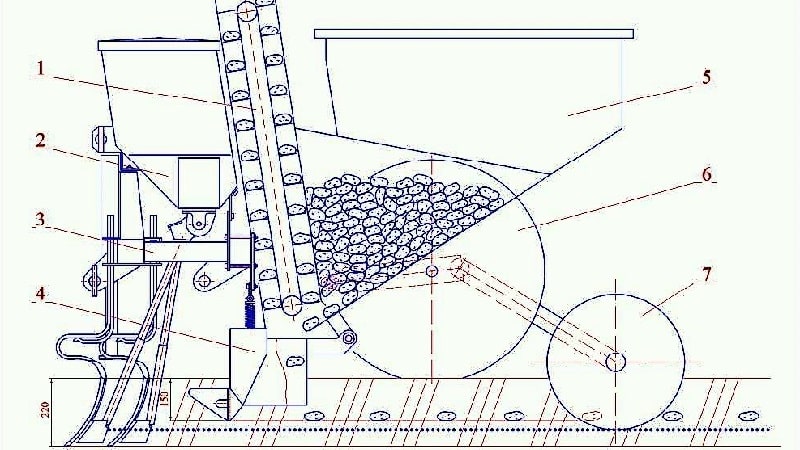
Wire is wound onto a pipe with a diameter of 50 mm. Then the resulting spiral is cut into whole turns and carefully welded to the chain at a distance of approximately 10 cm from each other. These will be grips for tubers. To prevent small tubers from falling through the rings, transverse bottoms are made from pieces of wire.
 The chain will scoop the tubers from the hopper, lift them and redirect them into the seed tube – a vertical pipe that is rigidly attached to the frame of the potato planter. The diameter of the seed tube should be 10-15 mm larger than the diameter of the chain gripping rings. To ensure that when potato tubers pass over the top sprocket they fall directly into the seed tube and not past it, limiter cheeks made of thin sheet steel are welded on both sides. The circuit is opened, passed through the seed tube, put on the sprockets and closed again.
Next to the lower sprocket, a piece of the same pipe from which the seed tube is made is welded to the frame. Through it, the chain with grips will return to the bunker. Its upper part is welded to the bottom of the bunker. The length of the pipe section should not be less than one and a half distances between the grips on the chain (so that the tubers do not fall out of the hole in the bottom, but are held by the next grip from below).
The chain is tensioned, removing excess links. After strengthening all the parts, the assembly can be painted using a spray gun.
Next, coulters are welded to the frame, the task of which is to cover the tubers with soil. The central axis of a pair of openers should be attached directly under the center of the pipe from which the chain with cups (seed tube) emerges. The potato planter is ready.
Read also:
How to make a potato planter for a mini tractor
How to plant potatoes correctly: a description of the best methods
Tips and tricks
Despite the simplicity of the design, In order for the assembled unit to work, individual components and parts require extreme care.
Thick wire should be wound with the expectation that Rings cut from it for grips will increase slightly in diameter when attached to chain links. Therefore, the pipe on which the wire will be wound must have a smaller diameter.
The drive chain cannot and should not be stretched like a string. It can fluctuate, and along with it the grips will be subject to vibrations. In this regard, they may not enter the seed tube. This will cause the grip to rest against the edge of the pipe and either break the chain or break off on its own. If you make this pipe with a much larger diameter, small-sized tubers will begin to fall through it, bypassing obstacles in the form of grips.
To solve the problem of vibrations and not increase the diameter of the seed tube, you need just equip its input ends with bells. It should be taken into account that the bell is part of the seed tube, which does not block the fall of tubers, which means that the bunker in the structure should be raised a little higher by the length of the bell.
Important! Provide high-quality lubrication to the bearings holding the chain drive axle, as well as the sprockets. Otherwise, the mechanism will constantly jam. And one more thing: after the planting mechanism has been adjusted, you should cut off the frame and seed tube from the walk-behind tractor and install it with bolts - this way you will preserve the versatility of the walk-behind tractor.
Conclusion
The potato planter should be a detachable block that can be screwed to the walk-behind tractor body with several bolts. The peculiarity of the described design is that theoretically it can plant tubers at any speed, since the movement of the walk-behind tractor is synchronized with the rotation of the transmission sprockets (using lugs). However, in practice, in order to avoid chaotic planting of potatoes, it is not recommended to move the walk-behind tractor at a speed of more than 1 km/h.