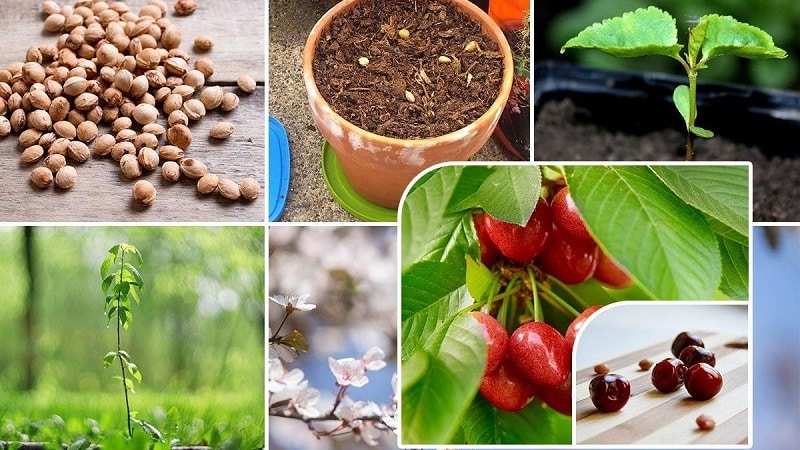
How to grow cherries from seeds at home
Usually, cherries are propagated vegetatively, using cuttings or root shoots. However, you can also grow a tree from a seed. Such plants are more resilient, but do not always inherit maternal characteristics. It often turns out wild, producing small and sour fruits. But it can be beneficial by becoming a rootstock or simply decorating a garden.
Cherry seeds can hatch even in open ground, but many gardeners prefer to grow seedlings at home, and when they become stronger, plant them in a permanent place. This increases the likelihood that the plant will take root. For more information about whether it is possible to grow cherries at home from seeds and how to do it, read the article.
Is it possible to grow cherries from seeds?
The seed material of the crop has a high germination rate. According to statistics, 7 out of 10 seeds germinate and turn into viable strong seedlings with proper care.
The generative method of tree propagation takes longerthan vegetative, and does not always give the desired results. However, if there are no cuttings and shoots of the variety you like, this option is also suitable.
Benefits of growing cherries from pits:
- Hardy plants. With the generative method of propagation, trees are more resilient than with the vegetative method.They have high winter hardiness, acquire resistance to negative environmental factors, and get used to the characteristics of a particular climate.
- High immunity. Resistance to diseases specific to a particular region is especially noticeable.
- Availability of planting material. Cuttings of the variety you like are not always easy to obtain, and purchased planting material is expensive. The seeds can be removed from fruits collected near a neighbor's plot or purchased in a store. Since cherries have a high germination rate, a large number of seedlings will grow from its seeds.
- Proper plant formation. When grown from seed, trees are formed more correctly and accurately than when propagated by cuttings.
- High survival rate of vaccinations. Trees grown from seeds become a hardy and viable rootstock for fastidious varieties. Rootstocks take root well on such a scion.
This method of reproduction also has its disadvantages.:
- Long growing process. At first, a grassy, weak sprout grows from the planting material, gradually it begins to become woody and gain growth. With the vegetative method, a fairly large and strong cutting is immediately planted, which quickly begins to grow.
- Delayed fruiting. Generatively grown cherries begin to bear fruit 2-4 years later than vegetatively propagated ones.
- Unpredictability of the result. It is impossible to predict whether a cultivated plant will grow from a seed or a wild one, although the second option is most likely. Sometimes a plant inherits maternal characteristics or receives the properties of the plant that was used to breed this variety.
At home, it is easier to create suitable conditions for the plant by controlling its development and choosing strong sprouts. But you don’t have to grow the seeds at home. Cherry planting material can also germinate on the site.
Many gardeners grow seedlings in pots until they become stronger, and only then plant them in open ground. Such planting material will need time to adapt, but it will definitely survive the winter. When planting seeds at a comfortable temperature, high germination rates are observed. This method is optimal when there is a small amount of planting material.
Note! Even if a wild animal grows from the seeds, the plants will find a use. They can become a strong rootstock or garden decoration.
Landing dates
The sooner the planting material is planted, the higher the chances of germination. Last year's seeds will not germinate well, so you should not use them.
You can’t plant cherries in July either.. In this case, the sprouts will turn out weak and non-viable. The best time for planting is the beginning of spring or the end of winter. Until this time, planting material must be stored in suitable conditions.
Beginning gardeners often plant seeds in the fall.. However, this time is not suitable for all regions. In cities with a warm climate, the period from summer to autumn is enough to harden planting material, while in cooler regions the seeds do not have time to undergo stratification until autumn.
Interesting things on the site:
Early ripening cherry variety "Bryansk pink"
Variety "Ovstuzhenka" with large berries and excellent taste
Selection and preparation of seeds
To easily germinate seeds and obtain high-quality seedlings, it is important to choose suitable planting material.
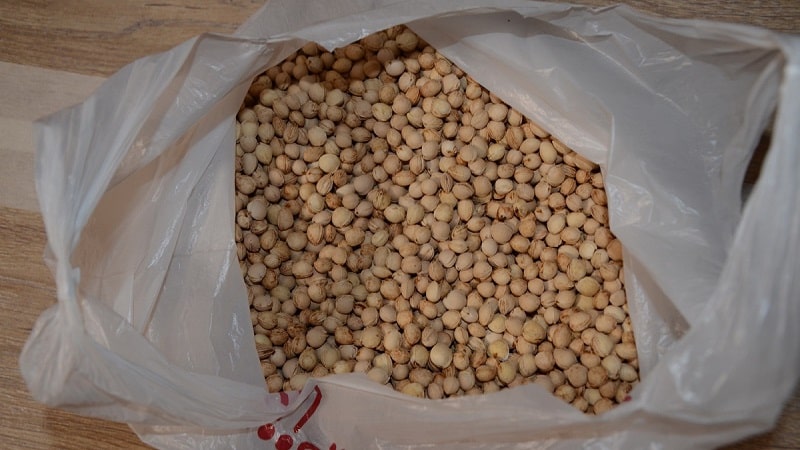
The main parameters that you need to pay attention to are presented in the list:
- Fruit ripeness. Unripe ones are not suitable. It is best to choose overripe specimens that have already fallen to the ground. It’s good if the berries have time to crack.
- Appearance of the fruit. They must have a beautiful, regular shape and a color characteristic of the variety. Specimens with green, rotten, dark, light, or moldy spots are not suitable. It is not recommended to use too small and twisted cherries as planting material, as this may be a sign of infection with viral diseases.
- Taste. It's better to try the fruits. The sweeter, more aromatic and tastier they are, the better. This increases the chances that the seed will grow into a tree that will bear cultivated fruits.
- Appearance of the seeds. They must be smooth, regular in shape, without cracks, bends, holes, stains, or mold. The seeds should not be dry. The current year's harvest is used for planting.
- Variety. Zoned varieties that grow successfully in these climatic conditions take root best.
For planting, berries are collected independently or purchased from private sellers on the market.. Cherries sold in supermarkets are usually picked unripe. This reduces its germination.
Before planting cherries, you need to prepare them. Primary actions are carried out immediately after collection.
Step-by-step description of primary preparation:
- Cleaning from pulp. First, this is done by hand, then soaked in cool water for 15 minutes, and placed on a cloth. They wipe the seeds with it, removing any remaining soft fibers, otherwise the seeds may rot.
- Soak. The bones are soaked in salted water for half an hour. Specimens that sink to the bottom are considered suitable for planting. The floating part will have low germination.
- Disinfection. To disinfect the seeds, just soak them for an hour in a light pink solution of potassium permanganate.
Stratification
After initial preparation, stratification follows. This procedure is also called hardening. It involves creating conditions for the cherry material that are similar to those that are natural in winter. In this case, the temperature will be slightly higher, so the seeds will not die.
It is convenient to use a box for stratification. Pre-disinfected (oven-heated) sand is poured into it. Place the bones on top in one layer. They are covered with a substrate made from equal parts of peat, sand and sawdust. The soil is moistened with a spray bottle.
The container is placed in the refrigerator or an unheated room, for example, in a country house. The optimal stratification temperature is +2…+6°C.
During the entire storage period, planting material is checked every week. for mold, stains and rot. As the soil dries, moisten it with water.
In the southern regions, stratification is carried out on the street. To do this, in the fall, a pot or box with planting material is buried in the ground. They dig it up in the spring, when the snow melts.
Note! Stratification begins in the fall. It lasts from 3 to 5 months. The fact that the stratification process has been completed is indicated by the bursting of the shell, from which sprouts emerge.
How to plant a cherry seed in a pot
For planting cherries, use individual glasses, a common box or a large clay pot.The container must be disinfected by dousing it with boiling water or soaking it for an hour in a dark pink solution of potassium permanganate.
You will need soil for planting. It is prepared from 1 part river sand and 3 parts garden soil. Purchased soil mixture for seedlings is also suitable.
To reduce the likelihood of moisture stagnation, use drainage: expanded clay, crushed bricks or ceramic dishes, small crushed stone, purchased drainage stones.
The soil and drainage are also disinfected. They are calcined in the oven, poured with a dark pink solution of potassium permanganate or copper sulfate (1 tbsp per bucket of water).
Step-by-step instructions for planting cherry pits:
- A 1-5 cm layer of drainage is poured onto the bottom of the container. The remaining volume is filled with soil so that a distance of at least 3 cm remains free to the edges of the container.
- Furrows are made in the ground 1.2-2 cm deep. Planting material is placed in them so that the distance between individual units is at least 3 cm.
- The furrows are filled with soil without compaction.
- The soil is moistened with warm water from a spray bottle. The box is covered with film and placed on the windowsill in a cool room.
Possible mistakes
Beginner gardeners make errors that negatively affect the germination procedure:
- Refusal of stratification. In this case, the sprouts turn out weak and die when transplanted to a permanent place.
- Growing in a drafty room. The room should be cool, but without drafts. They contribute to seedlings being affected by blackleg.
- Lack of lighting. The sprouts turn out weak and elongated.
- Watering the plantings too much. In this case, the bones rot.
Read also:
Caring for a planted seed and seedling at home
To grow a hardy seedling, it is important to provide it with proper care. For this Don't skip the main steps:
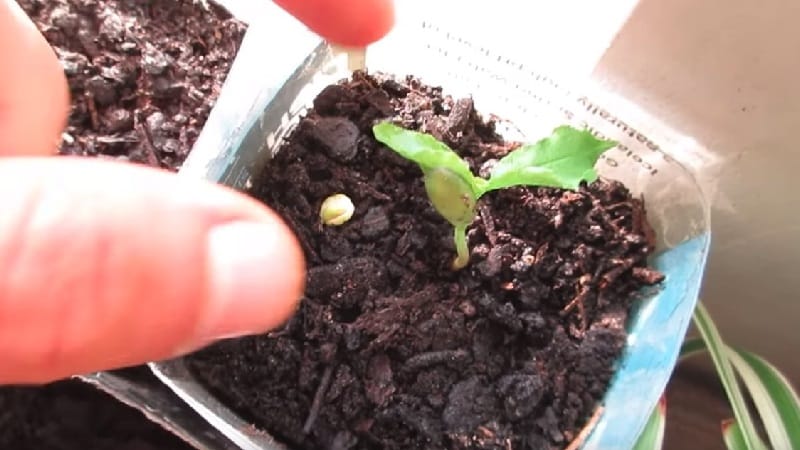
- Until the first shoots appear, the containers should be under film or glass, which is removed daily for 5-15 minutes. As the soil dries, moisten it with a spray bottle. On average, seedlings appear 25 days after planting.
- Water the sprouts as the soil dries under the roots with warm water. It is convenient to use special watering cans with a thin spout.
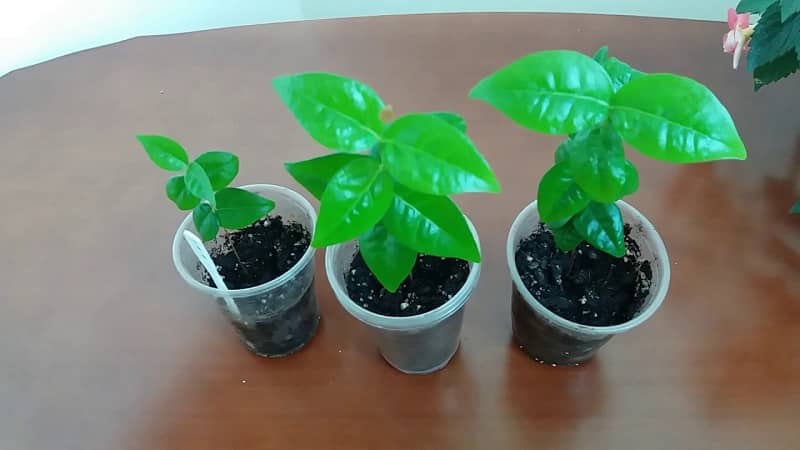
- After the appearance of 4 leaves, future trees are planted in separate containers. This must be done carefully, trying not to damage the roots.
- After the appearance of 2 leaves, the cherries begin to be fed. Do this once a month, alternating organic and mineral fertilizers. In this case, the solution should be 2 times weaker than normal. Fertilizers are applied immediately after watering the plant. Moist soil will protect the roots from burns.
- The next day after watering and fertilizing, the soil is loosened. It is convenient to do this with a regular fork, being careful not to damage the roots.
- Sweet cherries need hardening. To avoid possible problems, the plant is grown in a pot on the street or balcony from late spring until transplantation into open ground.
- To prevent diseases, the soil in the pot is watered daily with a Fitosporin solution.
Transplantation into open ground
By autumn, cherry seedlings reach a height of 40 cm. This makes it possible to transplant them into open ground.
The process of transferring to a permanent location occurs in mid-September or early October. This way the plant will have time to adapt to new conditions before the onset of frost.
The place for planting cherries should be protected from the wind and located on a southern or southwestern slope.It is important that groundwater does not lie too close to the surface.
The soil for replanting the plant is prepared in advance. Prepare a hole that will be 20 cm deeper and wider than the diameter of the pot. The soil removed from it is mixed with 1 kg of ash and 1 bag of humus. A hot solution of copper sulfate is poured into the hole, and water is added before planting.
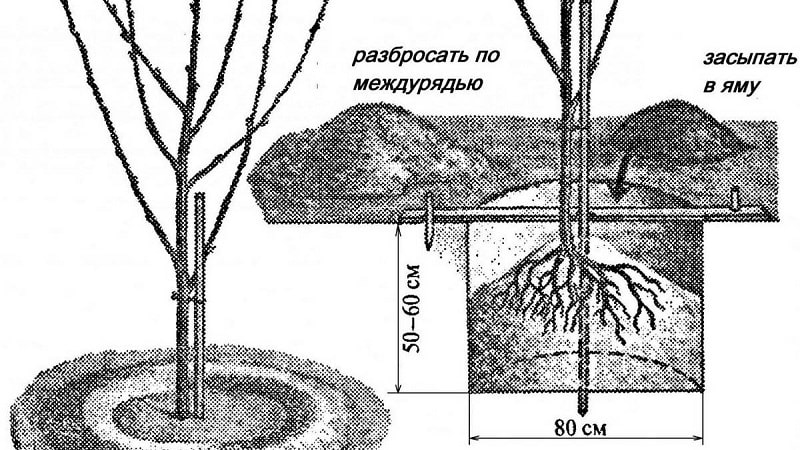
Planting a seedling in a permanent place:
- A 10 cm layer of drainage (expanded clay, ground brick or ceramics, river sand, small crushed stone) is poured into the bottom of the hole. 10 cm of nutrient soil mixture is poured onto the drainage.
- The cherry is removed from the pot along with a lump of earth. The seedling is placed in the hole.
- Cover with soil, compacting it layer by layer.
- The soil is watered with 1-2 buckets of water. The tree trunk circle is mulched with hay, sawdust, bark, straw or peat.
Further care
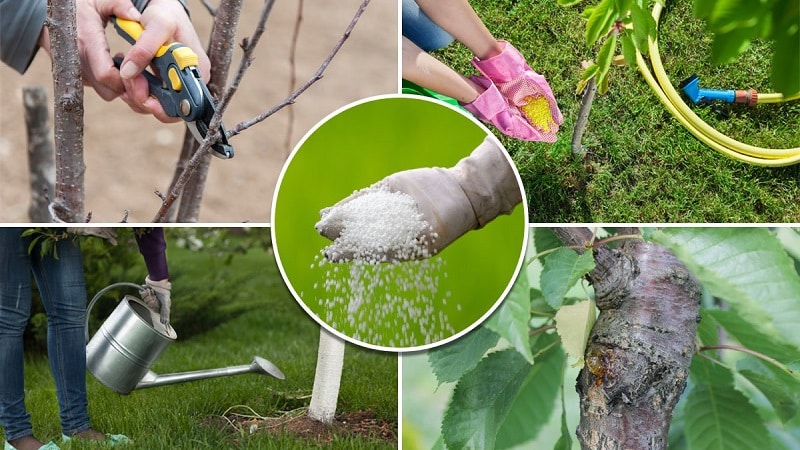
How to grow cherries from seeds:
- Watering. After planting, the tree is watered. No more watering is planned this fall. Next, the tree is moistened during dry periods, spending 4-5 buckets of water at room temperature per plant. Watering is carried out in the morning or evening, when the sun is inactive. It is especially important to keep the soil moist in May and June. At this time, the cherries are watered every 2 weeks.
- Mulching and loosening. After each watering and precipitation, the soil around young trees is loosened to destroy the earthen crust, normalize air circulation, and prevent moisture stagnation. During the loosening process, weeds are removed around the one-year-old tree. Mulching will help reduce the amount of loosening and weeding. This layer will provide additional fertilizer and protection against pests and diseases.
- Feeding. In the first 3 years of the cherry tree, the fertilizers that were applied during planting are sufficient.Then, every year in the fall, a bucket of humus, 35 g of superphosphate and 20 g of potassium fertilizers per 1 square meter are added to the digging. m.
- Preventive spraying. In spring and autumn, trees are sprayed with a solution of copper sulfate.
- Trimming. Sanitary and formative pruning is carried out annually. In the process, a crown is formed and old, dry, damaged branches are removed.
- Preparing for winter. Young trees must be insulated. To do this, raise the mulch layer as high as possible, wrap the branches with non-woven material, and, if possible, make protection from heat-insulating material. Also, before wintering, leaves and various plant debris are removed, and the last watering is done in October.
How to plant cherry pits directly in open ground
Cherries can be sown immediately in open ground. Reviews say that in this case the plants will be even more hardy and grow faster. However, germination will be lower, and not all shoots will survive the winter.
Before planting cherries, dig up the soil. For 1 sq. m add 10 kg of humus or manure, 35 g of superphosphate, 20 g of potassium fertilizers, 1 tbsp. ash. Fertilizers are mixed with soil.
The seeds are planted in rows to a depth of 3 cm.. The distance between rows should be 30 cm, and between seedlings in the same row - 15 cm.
Plantings are watered with warm water as the soil dries. After each watering and precipitation, the soil is loosened and weeds are removed.
Before wintering, the soil is cleaned from plant residues, remove all weak cherry shoots, leaving strong and hardy ones. Plantings for the winter are covered with a layer of straw, peat or hay.
How to graft a twig grown from a seed
Often, cherries propagated generatively do not bear fruit. Vaccination will help correct this. Cleft grafting technique:
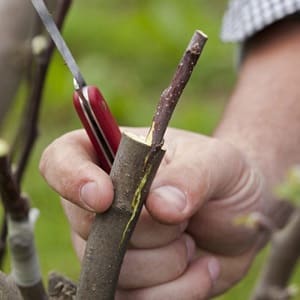 The three-year-old rootstock is pruned so that the remaining trunk rises 15-20 cm above the ground. A split 4-5 cm deep is made in the center.
- The rootstock is taken from a cultivated tree that has already bear fruit. It must have at least 3 healthy buds. All leaves are torn off. The lower part is sharpened with a flat wedge 4-5 cm long.
- The scion is inserted into the rootstock so that the wedge completely coincides with the split, and the cambial tissues on at least one side are at the same level.
- The connection point is fixed by wrapping it with garden tape or electrical tape.
Conclusion
It is possible to grow cherries from seeds. Such a seedling will have high frost resistance, resistance to diseases and adverse environmental factors. It will make a good rootstock or garden decoration.