How to make a potato digger with your own hands: step-by-step instructions from A to Z
A quick potato harvest is important not only for farmers, but also for owners of personal plots. To speed up the energy-consuming process, many gardeners have mastered a universal attachment - a potato digger, made independently. Factory analogues are not cheap, so we recommend making a simple and effective unit with your own hands.
What is a potato digger
Digging potatoes for walk-behind tractor – a common vehicle on a personal plot. To perform various works, attachments are installed on it. One of its most popular types is the potato digger.
This device allows you to separate potatoes from the soil and throw them onto the surface of the earth without damaging them. All that remains is to collect the tubers in a suitable container. The mechanism is used both in large farms and in small areas.
Factory-made products are expensive: prices range from 6.5 to 13 thousand rubles. There are also cheaper Chinese-made models on trading platforms, but their quality is questionable. Therefore, it makes sense to start making a potato digger for use on small acreage.
Craftsmen who have tried homemade equipment in action talk about its many advantages:
- Ease of use.
- Increased labor productivity.
- Selecting design dimensions suitable for use by the farmer.
- The ability to sharpen rods to suit the characteristics of your soil, as well as a specific model of walk-behind tractor.
- Good harvesting speed - it is possible to select tubers on an area of 0.1-0.2 hectares in 1 hour.
- Optimization and relief of physical activity.
- Gentle removal of tubers from the ground.
- Significant cost savings.
- Possibility of using for digging other root crops, cultivating soil in the garden and in the garden.
The only drawback is that a homemade digger will only be effective on light and medium-heavy soil.
What does it look like
The attachment has a simple design, so making it yourself will not be difficult.
Attention! The digger is used in an area cleared of grass and tops, otherwise the fasteners and grate will quickly become clogged.
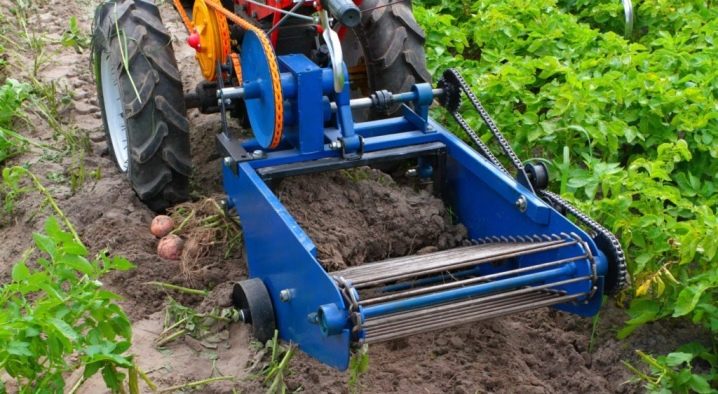
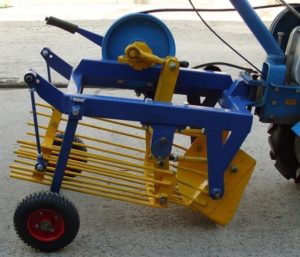
Externally, the device resembles an ordinary wheelbarrow, but differs in the presence of teeth and mechanisms for rotating the transport belt. It is also equipped with an element for fixing to a walk-behind tractor or mini tractor.
Comprises:
- Frames.
- Elevator for transporting potatoes. It is a mesh or lattice that performs the function of cleaning tubers from the soil. Equipped with side walls to prevent potatoes from falling out.
- Shafts that cause the grate to vibrate.
- Plow with knives (ploughshare).
- The supporting mechanism that sets the structure in motion. It includes wheels, bearings, hubs, chains, etc.
Principle of operation
A potato digger for a walk-behind tractor helps to extract not only potatoes from the ground, but also beets, carrots, onions, and garlic. It works like a shovel or plow, but teeth or rods are welded to the parts.
This happens as follows:
- The plow is immersed in the ground to a depth of 20 to 50 cm.
- When moving, the walk-behind tractor pulls out the tubers along with the soil, after which the mixture falls on the grate.
- On it, the earth is sifted thanks to vibration, and the cleaned tubers fall into a container. There may not be such a collection, then the potatoes will fall to the ground. Afterwards, all you have to do is walk across the field and harvest.
Compared to a shovel, a potato digger significantly reduces the consumption of physical force.
Reference. This type of technique allows you to avoid damage to the tubers and carefully harvest the crop. If the surface of a vegetable is slightly scratched, it is better to eat it immediately.
Types of potato diggers
There are 2 types of potato diggers on the market:
- passive;
- active.
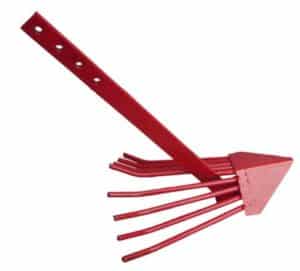
Passive equipment includes attachments that have a simple design and low cost. Such devices are called lancet, fan or simple. The main working element is a shovel on which rods are welded.
This is very reliable equipment, but it has low performance. In addition, approximately 15% of the crop remains in the soil. Other negative points include high fuel consumption and shallow digging depth (15 cm). The working width is 20 cm. This device is mounted on a cultivator or walk-behind tractor.
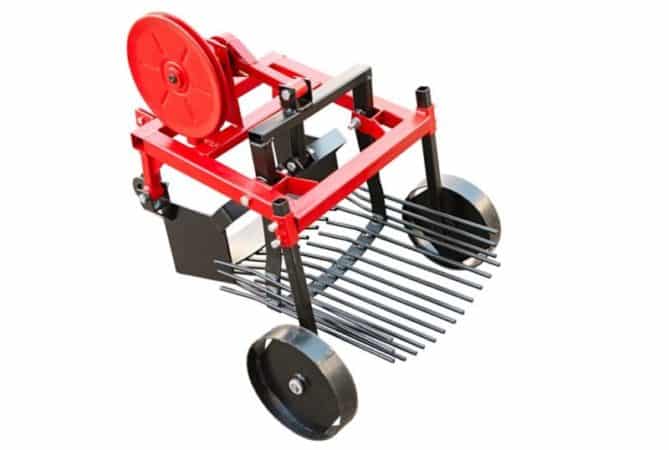
Active potato diggers are divided into the following types:
- conveyor;
- vibrating (screening).
Vibrating potato diggers work thanks to a ploughshare and a vibrating table. The design is improved by connecting a mesh. The device is equipped with one or two eccentrics.
Conveyor models are divided into belt and conveyor models. Their main difference from other models is the presence of a belt on which the soil with potatoes is sifted.The fuel consumption of such models is minimal, and the harvest percentage reaches 98%.

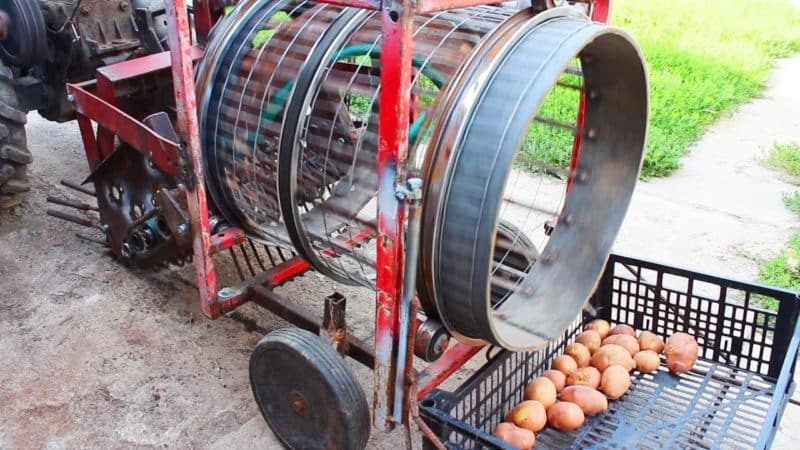
There are also drum potato diggers. They are used over large areas. The device consists of 3 main elements:
- knife;
- frames;
- rotating drum, which is made of steel rods.
The knife is mounted on the frame using a hinge joint. He cuts off the layer of soil along with the potatoes. As the drum rotates, lumps of earth break up and spill out through the grate, and the tubers fall out onto the arable land.
Which is better
There are many popular models. Before making a final decision, it is important to decide on the following parameters:
- Area of the treated area. The power of the technology depends on it.
- Soil quality. The simplest equipment will not cope with hard ground.
- Humidity. Cheap and low-power potato diggers do not work well with wet soil.
- Device dimensions. Wide ones are used on large plantations, and narrow ones are used in vegetable gardens for single beds.
- Type of peeling potatoes from soil. Different models of potato diggers clean clay, loam, black soil, and sandstone in different ways.
- The presence of additional elements, for example, wheels.
- Type of fastener.
- Cost of the device.
- Condition of the main equipment, i.e. walk-behind tractor or mini-tractor. Modern attachments are often not suitable for outdated models.
What type of potato digger can you make yourself?
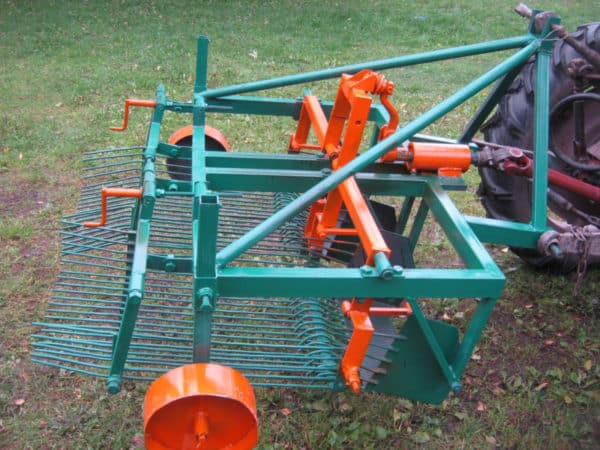
The most suitable type of potato digger for self-production is considered to be vibration-type devices.
This is a universal mechanism that is used for small and medium-sized areas. Plus it's easy to make. For large fields, it is better to choose a drum-type potato digger.
This is interesting:
A device for sorting potatoes and how to make it yourself
How to make a potato hiller for a walk-behind tractor with your own hands
How to make a potato digger with your own hands
Making the device yourself is easy. The main thing is to adhere to the algorithm of actions, prepare all materials and drawings.
Required materials and tools
To manufacture a vibration-type device, you will need special tools and equipment.
Required tools:
- welding machine;
- Bulgarian;
- drill and drill bits;
- heavy hammer or sledgehammer;
- a set of keys;
- square;
- calipers;
- level.
After collecting the instrument, prepare the following materials:
- steel sheet approximately 8 mm thick;
- metal profile (channel No. 8);
- steel rods or reinforcement with a diameter of 10 mm;
- a pipe intended for making racks;
- corner;
- bolts, nuts and metal plates for fastening;
- roller chain;
- wheels.
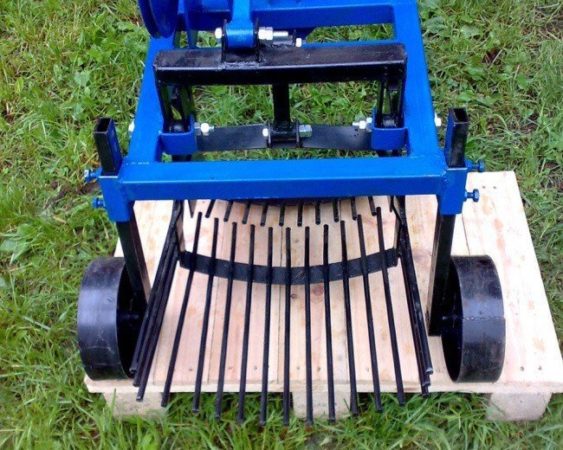
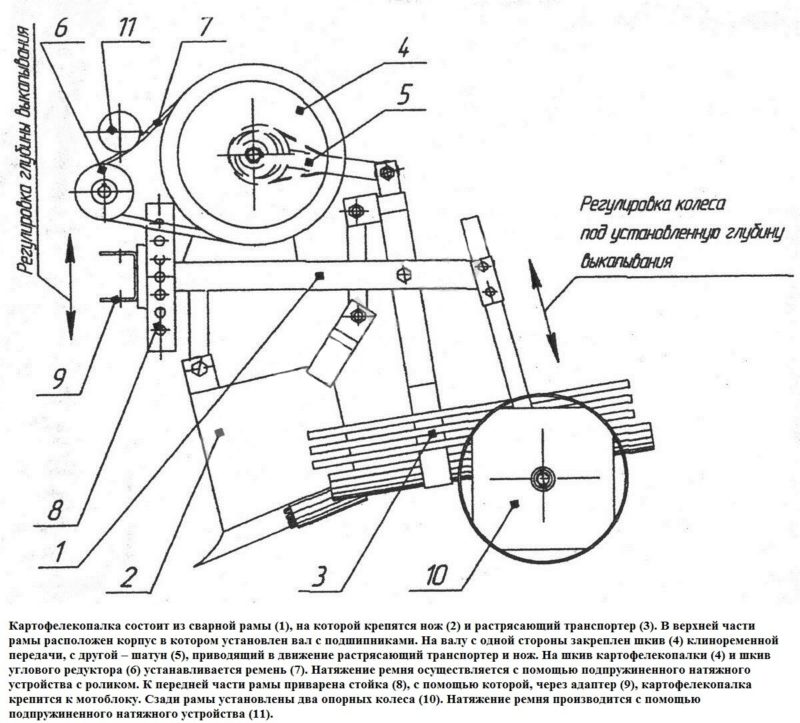
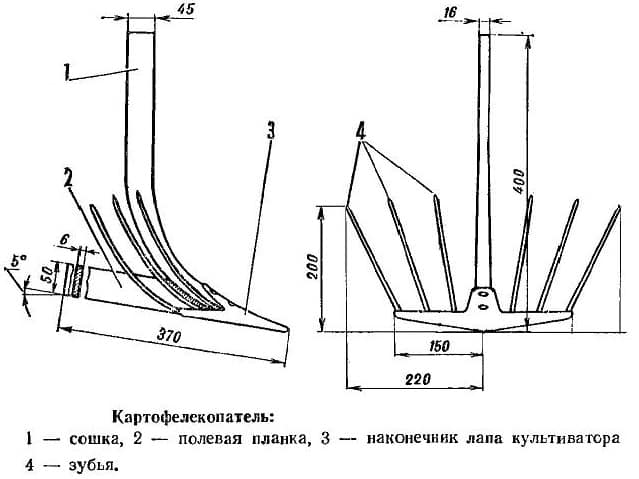
Schemes and drawings
It is important to prepare a drawing of the future device in advance. The easiest way is to use a ready-made one. Below are several examples of different types of potato diggers.
Step-by-step instruction
Step-by-step algorithm for assembling a potato digger:
- Making a frame. It is welded from a corner with dimensions of 63 by 40 mm and channel No. 8. Frame length is approximately 120 cm.
- The first channel is welded at a distance of 1/3 from the beginning of the frame, and the second - at a distance of 1/6 from the front edge. These channels will serve as the basis for attaching an element designed to regulate the digger.
- On the sides of the frame, metal posts are welded vertically to the ground at a distance of 10 cm from each other. Their lengths are different. They start with 50 cm, then 40, 30, etc.The base for the grille will be welded onto these posts.
- Channels are welded to the shortest posts so as to obtain 2 rigid triangles on which the ploughshare will be fixed.
- A 30 mm wide plate is cut out of a sheet of metal and welded to one of the triangles. After cooling, it is bent and screwed to another triangle using bolts.
- To make a ploughshare, use an old plow, metal plates or a pipe with a cross-section of 200 mm, cut lengthwise. The workpiece is bent like a plow and a round sharpening is performed. The ploughshare is secured to the elevator casing using bolts.
- Metal rods are cut. The length is selected so that on one side they are welded to the plate, and on the other they protrude beyond the frame. The rods are welded at a distance of 4 cm from each other.
- A metal bracket, which is made from a pipe or strip, is welded to the free ends of the rods. To ensure the mobility of the bracket, it is secured to a hinge joint.
- If necessary, the elevator is replaced with a cleaning drum. It is made in the form of a half-cylinder from reinforcement and metal strips.
- Now a reduction unit is installed, with the help of which the inclination of the elevator and ploughshare will be changed. The reduction block is mounted on the slider rod on bearings.
- The connecting bridge rod is secured using sprockets. Metal discs are welded onto it on both sides and wheels are attached.
This completes the production of the potato digger. All that remains is to mount it on a walk-behind tractor or mini-tractor and make a test pass.
Attaching the potato digger to the unit
Method of attachment to the walk-behind tractor:
- They start by preparing the walk-behind tractor. Remove the protection from the power take-off shaft.Remove the locking pin from the tow assembly.
- A half-cardan is put on the input shaft of the potato digger gearbox.
- The device is connected to the trailer unit of the walk-behind tractor. Fix with a finger.
- At this stage, the functionality of the driven and drive shafts is checked. To adjust the alignment, use the adjusting bolts on the trailer unit.
- Locknuts are used to secure all threaded connections.
One of the most important steps is adjusting the length of the half-cardan. It is installed so that there is a gap of 5-10 mm relative to the gearbox.
To connect to a mini-tractor, you will have to purchase a special mechanism designed to connect a potato digger as an attachment.
Useful tips on the topic
Useful tips that will come in handy when making and using a homemade potato digger:
- To bend a metal plate or other element of the device, it is first heated using a gas burner. After obtaining the desired shape, the part is hardened.
- It is advisable to prepare a drawing of the device and all significant components in advance.
- Beginners are advised to first transfer all dimensions from the drawing to cardboard and assemble the model. Only after this start cutting metal. This technique helps to clearly see all the problem areas.
- During testing of the finished device, a test pass is made. You only need to travel a few meters to see how well or poorly the potato digger works. If necessary, change the angle of inclination and depth of immersion.
- Proper configuration of the device increases productivity to the maximum.
Conclusion
Any type of potato digger allows you to speed up and facilitate work in the field or in the garden.When producing it yourself, the farmer saves a large amount.
In order for the device to turn out to be of high quality and to cope well with its tasks, it is important to use the drawings. This reduces the likelihood of errors occurring at different stages of work.