Why are pitchforks good for digging potatoes and how to make them yourself
To harvest potatoes from a small area, it is not profitable to use a walk-behind tractor or a mini-tractor. Therefore, many gardeners still use their grandfather’s tools, preferring a pitchfork rather than a shovel. Let's consider how to choose this tool, use it correctly and make it yourself.
Are pitchforks good for digging potatoes?
There is even a special type of tool for digging up tubers, collecting and reloading the crop - ball (potato or beet) forks.
Advantages and disadvantages
Advantages of forks when harvesting potatoes: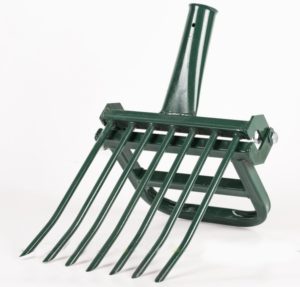
- relatively light weight;
- slight resistance and soil adhesion when the teeth enter the ground;
- the ability to completely dig up a potato nest;
- separation of soil from tubers by sifting through teeth during digging;
- low probability of damage to vegetables;
- not harming earthworms.
Flaws:
- a tuber pierced by a pitchfork quickly rots;
- when working in an area with heavy clay soil, stronger and thicker teeth will be needed, which will make the tool heavier;
- there is a risk of injuring your legs during work.
When harvesting potatoes with a fork with very sharp teeth, it is better to use tarpaulin boots as work shoes.
Which forks are suitable
There are many types of this tool, but the following are suitable for digging:
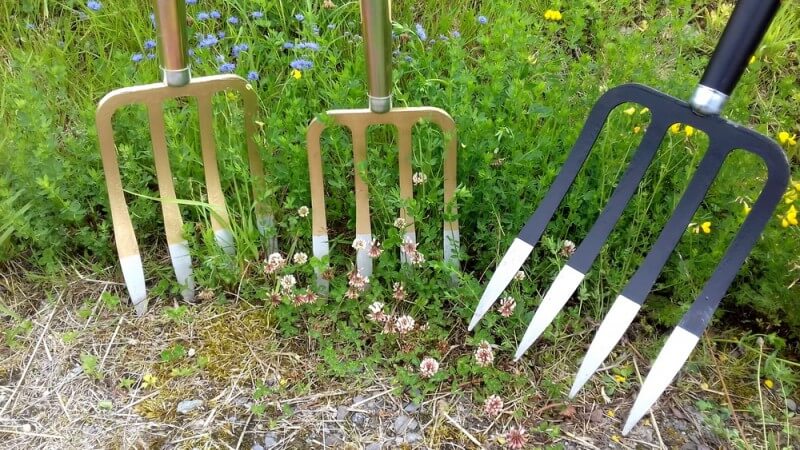
- Classic - forks with 4 (very rarely 5) teeth with a diameter of 5–10 mm and a length of 300–350 mm, the distance between which is 80–100 mm.The thickness of the rods gradually decreases and at the ends is 2–4 mm. Typically used for digging up soil.
- Garden - very similar to the classic ones, but the teeth are pointed only at the ends, and the outer ones are sometimes slightly longer than the central ones. Thanks to the slight curvature of the pins, the tool makes it easy to move tops and tubers.
- Digging - especially strong, with flattened teeth. To make digging easier, the crossbar often has a foot rest.
- Fork-shovel — a knife is welded to the end of the pins, which makes it easy to cut off the roots of weeds and sift the soil.
- Dung, or economic — have a very durable design, but are suitable for digging only with 4 teeth (they are also available with 3).
- Cleaning — are produced with thin rods, so they are suitable only for light sandy soil.
- Crushed stone - although they are designed for handling crushed stone, but, according to numerous reviews, they are excellent for digging potatoes.
- Ball — created specifically for harvesting root crops and tubers (carrots, beets and potatoes). They have many pins, each of which ends in a small curve with a diameter of 8–12 mm, so as not to pierce the vegetable.
Some forks are not suitable for digging potatoes according to their characteristics:
- pick-up teeth - due to strongly curved (up to 80°) teeth;
- hay - have pins up to 70 cm long;
- floral - very small, and some have only 2 pins;
- forks for stables, made in the shape of a plastic scoop.
This is interesting:
Vibrating potato diggers - review, reviews, faults
How to make a potato digger with your own hands: step-by-step instructions from A to Z
How to choose ready-made
There are a lot of gardening tools in stores, so it is often difficult for vegetable growers to navigate when choosing a tool. It is important to understand which forks are suitable for the site, given that the number of teeth must be at least 4, and their thickness must correspond to the density of the soil.
It is desirable to have a forged working part made from a single piece of metal.
Reference. Despite the high price, telescopic forks are very convenient to use, with adjustable handle lengths made of aluminum and durable plastic.
When choosing a conventional tool with a welding work base, it is recommended to pay attention to the following:
- quality of welds;
- steel of the working part (it must have an anti-corrosion coating);
- the teeth, if not provided for by the design, must have the same size and distance between each other;
- The handle is metal (the best option is aluminum), oak and birch are preferred from wood.
The best companies producing high-quality gardening tools are:
- from foreign - Grinda, Topex, Fiskars, Gardena;
- from domestic ones - “Tsentroinstrument”, “SPETS” and “Zubr”.
How to make it yourself
Making a pitchfork with your own hands is not difficult, but in addition to the materials themselves, you will need certain tools and the ability to use them.
Materials and tools
To make a fork for digging potatoes you will need the following tools:
- grinder or hacksaw;
- welding inverter;
- electric drill and thin metal drill;
- file.
Materials:
- steel rod for crossbar with a diameter of 15–20 mm;
- steel wire for teeth with a diameter of 8–10 mm;
- a piece of steel pipe for a tulle with a diameter of 45 mm and a length of 100 mm;
- oak or birch cuttings (better to buy in a store);
- sandpaper;
- paint, varnish or wood impregnation.
To prevent the steel working part from rusting during storage, it is cleaned and rubbed with wax or paraffin, which is first dissolved in kerosene.
Step-by-step instruction
How to make a pitchfork yourself:
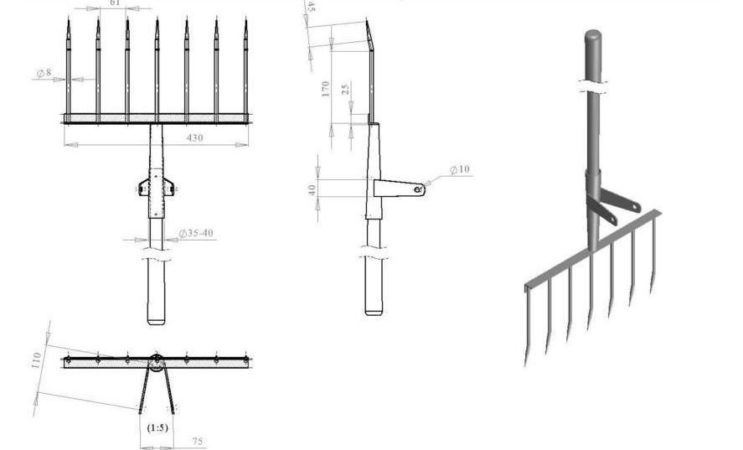
- 6 pieces of 350 mm each are cut from the wire.
- Using sandpaper, each of the rods is ground into a cone so that the diameter of the end is 3-4 mm.
- A piece 350 mm long is cut from a steel rod.
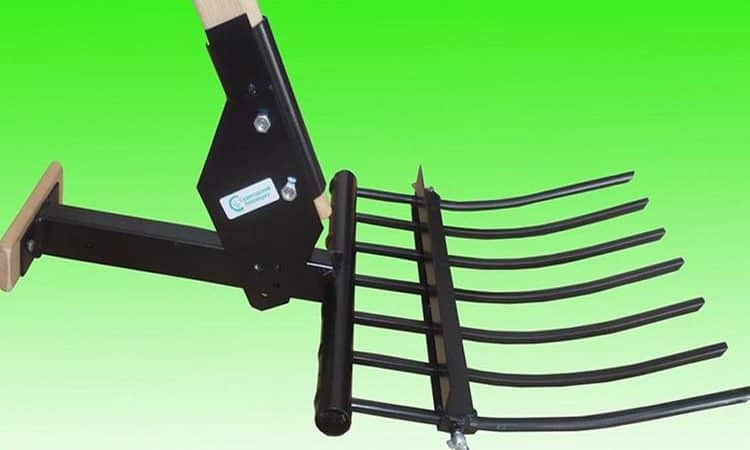
- The 6 previously made teeth are welded to the resulting crossbar with thick ends at an equal distance from each other.
- On the reverse side, a tulika is welded to the crossbar in the middle.
- The welding areas are leveled with a file.
- The handle is sanded with sandpaper, and one of the ends is rounded.
- A protective coating is applied to the handle and allowed to dry.
- The cutting with its raw end is inserted into the tulle. Having turned the pitchfork over, hit it 2-3 times with the other side on a hard surface.
- Use an electric drill to drill a hole in the tube.
- The handle is finally secured by screwing a screw of a suitable diameter into the hole.
How to properly dig potatoes with a pitchfork

For harvesting, 2 people are enough: digging and collecting tubers.
Reference. It is better to use plastic buckets as containers for collecting and carrying vegetables, as they are lighter than metal ones, or baskets through the holes in which soil will fall.
Dig and collect potatoes like this:
- The digger positions himself with his back to the sun in order to have a clear view of the bushes.
- The forks are stuck into the ground so as to capture the entire bush and not damage the tubers.The distance is selected experimentally, since it will not be the same for different potato varieties and soil composition.
- By pressing the handle, they lift up a bush with a layer of earth.
- The tops are thrown to one side.
- The earth is sifted through the teeth of a fork, and the tubers remaining on them are poured in the other direction. To be sure, a piece of land can be sifted several times to collect all the vegetables.
- The person walking behind places the dug potatoes in buckets or baskets. In this case, it is better to immediately sort the tubers.
Tips and tricks
Experienced gardeners who know how to make and modernize gardening equipment with their own hands give the following recommendations:
- in order not to load the back, the end of the handle when installing the forks vertically should be at the level of the digger’s chest;
- instead of a wooden handle, it is better to use a metal (ideally thick-walled aluminum) pipe, as it is more durable;
- in some homemade forks, craftsmen advise using a bicycle handlebar as the end of the handle, which increases comfort when working;
- cuttings made from high-quality polymer do not require maintenance and are lightweight, but are not suitable for working on heavy, dense soil.
The number of teeth on a classic fork is 4, but for digging potatoes it is desirable to have more (5 or 6) with a minimum crossbar length of 30 cm.
Reviews
Gardeners speak positively about using forks for digging potatoes, noting their productivity and simplicity.
Andrey, Kostroma region.: “Since many modern varieties have tubers arranged compactly, you have to pierce the ground with a pitchfork much less often than with a shovel. It is important to stick the latter closer to the stem.”
Galina, Tomsk: “From his region, my husband brought a method of digging potatoes that was new to us.Using a garden fork with wide flat tines, he turns the bush completely, tilts the tops in one direction, and the tubers side by side in the other. In terms of productivity, it can compete with a cultivator.”
Alexey, Moscow region: “I haven’t used a shovel since the last century. When planting, use only a flat cutter; when harvesting, use a fork. Is it sprouting? Of course it sprouts. But no more than after a shovel. The problem is not with the tool, but with the variety of potatoes planted. The better suited it is to local conditions, the larger the tubers will be.”
Read also:
Types of potato diggers for mini-tractors, operating principles and selection criteria
Conclusion
Harvesting potatoes has always been considered a labor-intensive and responsible job. However, choosing the right forks and handling them correctly helps save effort and time, and a self-made tool also saves money.