How to grow chestnuts from nuts at home
Chestnuts are real long-livers. The oldest tree grows in Sicily, whose age, according to scientists, is 2–4 thousand years. Several interesting traditions are associated with the plant. For example, in Geneva, for 2 centuries, the onset of spring has been associated with the appearance of the first leaf on the “official” chestnut tree growing under the windows of the government.
The plant is distinguished by a lush and spreading crown, beautiful flowering, and interesting fruits, which are edible in some species. The tree is unpretentious, so many gardeners grow it themselves. Let's look at how to grow chestnuts from walnuts in the fall and what conditions they require.
Selection of chestnut nut
There are many varieties of chestnut, so it is better to immediately decide which one you plan to grow at home.
Reference. Chestnuts are also called plants from other families, for example, horse chestnut. This is what is planted in public gardens and parks. The fruits are toxic, but are considered a valuable raw material in pharmaceuticals. From them, drugs are obtained for the treatment of vascular diseases.
Edible plant species: Japanese, Chinese, or softest, American, sowing. They are harvested annually, making reserves for the winter. The fruits are boiled, baked, fried, soups, pilaf, and salads are prepared with them.
To get a beautiful and healthy plant, it is important to choose the right seed:
- collection time: September and October;
- mother tree: mature, strong and strong;
- fruit maturity: only fully ripened fruits that have fallen to the ground;
- shape and size: preferably round and large, they are more viable than flat and one-sided;
- Brown color;
- surface: smooth, glossy, without damage.
It is recommended to harvest more seeds than required, since chestnuts do not have 100% germination.
Preparing and planting walnut chestnut trees at home
Before germinating chestnuts at home, it is important not only to properly collect, but also to prepare the nuts. To do this, stratification is carried out - simulating the effect of winter conditions on seeds.
Reference. Stratification ensures accelerated seed germination and increased germination.
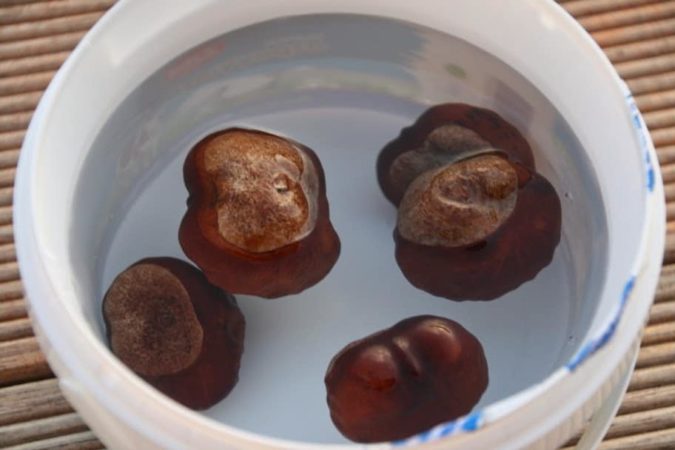
The collected fruits are placed in a container with moistened sand and placed in the basement, refrigerator or on the balcony. This way the seeds are stored until spring. In February - early March, chestnuts are removed from the sand, immersed in warm water and kept for a week, changing the water daily. The treatment softens the hard peel and promotes the germination of white sprouts, after which the nuts are ready for planting in the ground.
Under the same conditions, chestnuts are planted in pots in the fall. At the same time, autumn plants produce early shoots, but spring plants produce stronger and healthier offspring.
Choosing a pot and soil
You will need a pot with a volume of no more than 300–500 ml with mandatory drainage holes. A universal soil mixture for garden plants, which is sold in many specialized stores, is suitable as soil.
Be sure to prepare material for the drainage layer: broken brick, medium-sized crushed stone, expanded clay.
Planting and germination
Step-by-step planting of prepared seeds:
- Place a thin layer of drainage on the bottom of the pot.
- Fill the pot with soil.
- Moisturize well.
- Plant the chestnut tree, deepening it by 2-3 cm.If you plant a seed deep, it will take a long time to germinate; if it is near the surface, the sprouts will dry out and die.
Step-by-step germination:
- Place the pot in a lighted place, but out of direct sunlight.
- Water as the earthen ball dries. It is important to prevent water from stagnating and the soil from drying out too much.
- Gently loosen the soil periodically.
- Control the temperature at +20…+25°C.
- Avoid drafts.
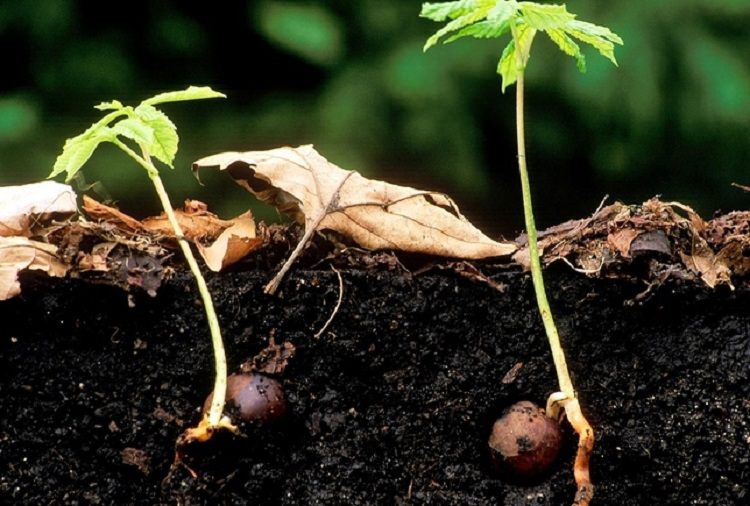
On average, approximately 2-3 weeks pass from the moment of planting to the emergence of seedlings.
Growing and caring for young chestnuts
Growing chestnuts from seeds yourself, like other young seedlings, will not be difficult - it is only important to create optimal conditions. For these plants, 3 components are extremely important: watering, temperature and lighting.
It is also not recommended to neglect other aspects (feeding, loosening), but without three basic conditions it is impossible to grow a beautiful plant.
Conditions for growth
To grow and form a strong and healthy plant, you need to provide the right conditions:
- Temperature not lower than +20°C. If the chestnut was planted in a pot in the fall, with the onset of winter it is provided with cooler conditions, within +14...+18°C.
- The lighting is neutral. A lack of light will lead to loss of color in the leaves, an excess will lead to burns. The best place is considered to be the eastern and western sides with shading from direct sunlight.
- Elimination of drafts.
- Regular loosening of the soil to provide oxygen to the roots.
It is important to periodically turn the sprout in different directions towards the light so that it is even and neat.
Watering and fertilizing
Proper watering is a condition necessary for the normal development of the sprout. It is important to provide frequent but moderate hydration.If there is a lack of moisture, the seedling will stop growing, and if there is too much moisture, the roots will rot.
Attention! The soil should always be slightly moist.
After watering, the soil is loosened so that a crust does not form and the root system can breathe.
It’s better not to rush into feeding. Typically, the universal soil mixture contains a complex of mineral fertilizers, which is enough for 2 months for the growth of a healthy plant. With the onset of warm weather (beginning - mid-May), the plant begins to be fed with complex mineral fertilizers every few weeks.
Rules for transplanting into open ground
To grow a chestnut from a nut at home, you will have to care for it step by step.
Important! You cannot immediately plant the sprout in open ground - it needs to be hardened off.
With the onset of warmth, in early - mid-May, the pot with the plant is periodically and briefly (with a gradual increase in time) taken outside to a shaded place. This is required to prepare and adapt the chestnut to outdoor conditions, increase its resistance to adverse environmental factors, and form strong roots.
When consistently warm weather sets in (usually in late May - early June), the crop transplanted into open ground. The process includes:
- Choosing a location. A well-lit area is suitable; the chestnut tolerates slight shade well.
- Digging and watering the soil. Any soil will do, but it is better if it is black soil.
- Digging a planting hole. It should be slightly larger than the root system, since the hole must be further processed.
- Preparing the hole. Place a drainage layer (10 cm) of a mixture of crushed stone and sand on the bottom. Prepare the near-root substrate: mix sand, humus and soil from the hole in a ratio of 1:1:2.Add slaked lime (500 g) and phosphorus-potassium fertilizers (several handfuls). Pour a third of the resulting substrate into the hole.
- Watering the planting hole.
- Preparing the seedling. Knead the pot slightly, carefully remove the plant while preserving the earthen lump as much as possible.
- Landing. Place the seedling in the center of the hole so that the root collar is level with the ground surface. Fill with the remaining mixture and compact the top layer near the trunk. The planting mound should rise slightly above the soil, since the soil will gradually settle under the influence of precipitation.
- Watering the plant and fencing it with stakes. If necessary, a garter for fixation and better rooting.
The culture is large and requires a lot of space. Therefore, the minimum distance to other plants is 3 m.
Rules for growing in open ground
The seedling gains strength within 4-5 years and by this time grows up to 1.5 m. The plant will begin to bear fruit at 6–8 years, and form a dense crown at 10.
Such development is possible with proper care, which includes:
- Watering. In the first year, the crop requires frequent and abundant moisture. In this case, the soil should be wet 10 cm deep and should not be allowed to dry out. Subsequently, the plant is watered as the soil dries.
- Loosening the earth. Performed to improve root aeration and reduce the risk of developing bacterial lesions.
- Mulching. After watering, the ground around the trunk is mulched with sawdust or humus.
- Fertilizer application. In the spring, feed with urea once (15–20 g per 10 liters of water). In the fall, a one-time fertilizing based on nitroammophoska (15 g per 10 liters of water) is applied. In this way, the plant is fertilized for 10 years, after which only autumn feeding is left.
- Fixation.The plant is fenced and tied to a support so that the young trunk is not damaged by wind and animals.
- Pruning and crown formation starting from 3 years. In spring, the seedling is cut to 1/4 of its height. The side branches are trimmed a little. The scheme is repeated every spring.
- Preparing for winter. With the onset of cold weather, the young tree is prepared for wintering: mulched with a thick layer of humus and dry leaves. This will protect the roots from freezing. A dome is built for the upper part: several stakes are placed so that the plant is in the center of a kind of pyramid. The structure is completely wrapped in agro-fabric, burlap or tarpaulin. From 7 years old, chestnuts do not need shelter.
Almost all care rules are followed for 10 years after planting a young seedling.
What to do with chestnut seedlings
Sprouts are shoots around the mother tree that weaken it and give it an unkempt appearance. Therefore, they must be removed. They are left only if there is a desire to propagate the crop by offspring-roots.
There are 2 ways to eliminate overgrowth: using chemicals (Roundall, Glucor) and mechanically.
Reference. Chemicals are used in extreme cases, when it is necessary to remove shoots along with the older crop.
To remove shoots correctly and safely for the mother plant, you need:
- Using a shovel, dig out the shoots to the base (the root of the main plant from which the shoots came).
- Separate the shoots from the roots with a shovel.
- Treat the cut area with garden varnish.
- Cover with soil.
It is not recommended to trim the growth with pruning shears close to the ground. This is a waste of time, as the shoots will begin to develop more intensively and their number will increase.
Conclusion
Chestnut is an unpretentious and beautiful crop, which is often grown from the fruit independently at home. However, before planting a chestnut at home, it is important to familiarize yourself with some rules: choosing seed material, its preparation and germination, creating optimal conditions, timely transplanting into open ground and further care.
You should be patient, as it will take at least 10 years to get a large and beautiful tree.